Multilingual Alexa Skills

Alexa devices support a large array of different languages but your skill needs to be updated to handle this.  There are 2 parts to adding an additional language to your skill – the interaction model and the code. Adding support for an additional language for your skill is quite simple but there are several options you can choose that will make your life easier in managing your skill. In this article we will see how to add support for different languages, and also how to determine which language was used in making a request.

Detecting the Language

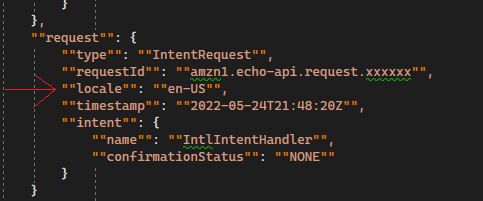
Before we add a new language, let’s see how to detect the language the user spoke when they made their request.  If you look at the incoming JSON for any intent request, you will see the “request” node and inside that is the “locale” node.  This tells you the language the user spoke in when they made their request, in this case English from the U. S.

Note there is nothing requiring you to reply in that same language – technically you can answer in any language you want.  However, you can image how poorly your skill will be viewed if the user asks for something in Italian and you answer in English.

So now we can tell what language was used, but we still haven’t told AWS that we want to accept additional languages.

Adding a Language

Adding support for a new language starts with updating the skill configuration.  Open the Alexa Developer Console and navigate to the skill you want to edit.  In the top left corner you will see a Select box.  Drop that down and select Language Settings.  That should take you to the screen shown on the right.

Click the “Add new language” button on the bottom left and choose Italian, then hit Save.  Your skill can now accept requests in Italian.  This obviously doesn’t mean your code is ready to accept Italian requests, but you have just told the Amazon speech recognition system that your skill is allowed to accept requests in Italian.

Interaction Models

If you are going to support different languages in your skill you will need to maintain a different interaction model for each language. This makes sense since the invocation language and sample phrases will all be different when working with a different language.  This also adds to the complication, though, because you must maintain each interaction model by hand.

If you navigate back to the interaction model definition screen (Build -> Interaction Model -> JSON Editor)  you will see in the top left corner that you can now select English and Italian.  Let’s say we want to change the invocationName of our skill.  We must now do that in both the English and Italian interaction models.  Each requires the same process of Save and Build Model before that interaction model becomes active.  Take care when updating interaction models with multiple languages because it is easy for them to get out of sync.

While editing your model you will probably need to add special characters to the invocations or sample phrases.  A standard serializer will change any characters into the escaped code version of that character.  For example the Spanish letter o with an accent is serialized as \u00F3.  You can type these characters into your interaction model as the special code, but once you save the model you will see the real character in the string.

Supporting Dialects

In the image above where we show the incoming JSON request it shows the user spoke in English.  If they spoke in Italian you would get a locale of “it-IT”.  The first 2 letters of the locale code is the language spoken, and the last 2 letters are what country the language is from.  For Italian the country in “it-IT” is not significant because the only dialect of Italian that is supported comes from Italy.  However, what happens when there are different dialects of a language, such as English or Spanish?

When you added the Italian language you may have noticed that there were many other languages available, and some had multiple versions.  For example English has English (AU), English (CA), English (IN), English (UK), and English (US).  These are different dialects of the language and your skill can support each one individually or all together.

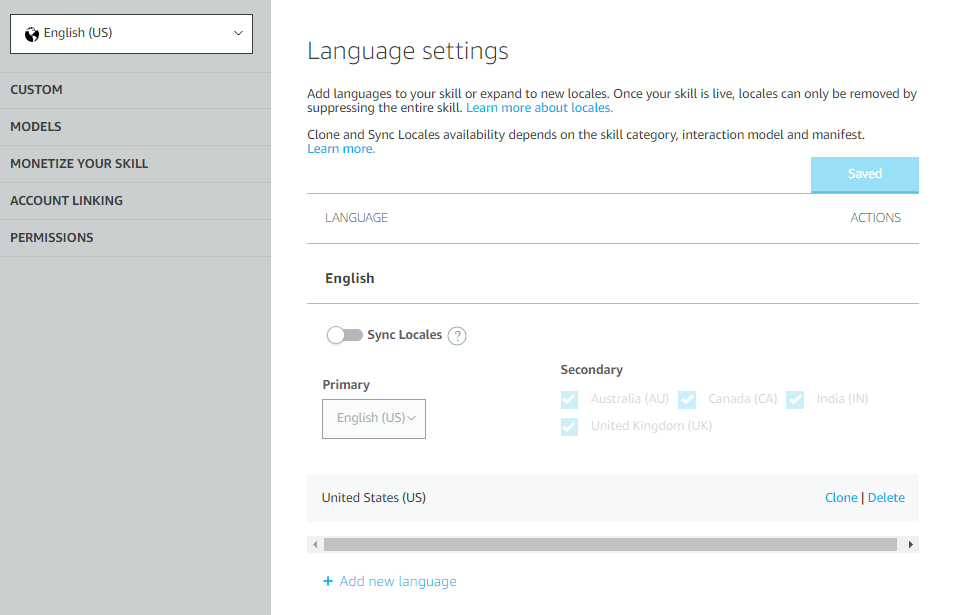
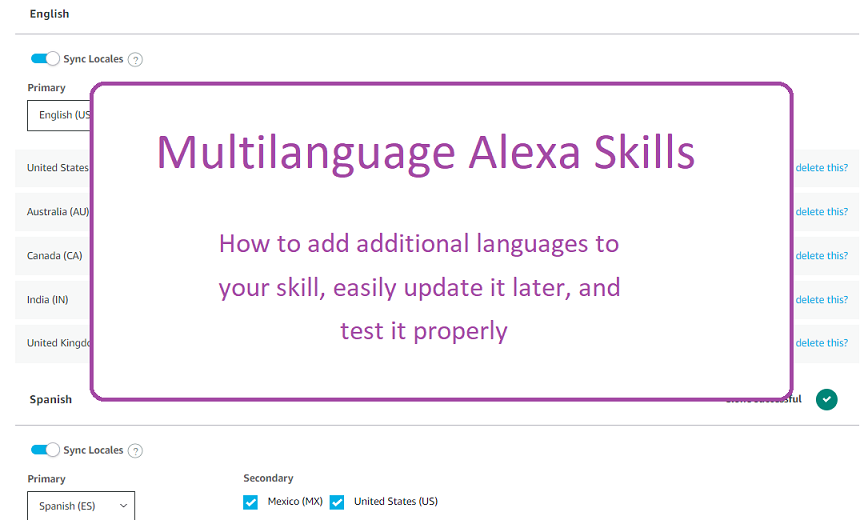
To see the difference in these, let’s add English (AU) and English (CA) to our skill.  Once you do so (and save) you will see the additional languages, but you will also see a Sync Locales switch and some check boxes under a Secondary heading.  Turn on the Sync Locales switch and you will see the image on the right.

What we have done is made English US our Primary English language while English AU and English CA are now Secondary.   This means when you update the interaction model of the English US language, all the other English interaction models will be synchronized to be the same.

You can try this yourself.  Navigate back to the JSON editor for the interaction model and in the upper left corner choose English US (the primary dialect).  Make a change in the interaction model and press Save.  You should see a message in the bottom right that says “Skill Saved Successfully”.

Now press the Build Model button. When you save and build the model you will eventually see a “Build Completed” (after the “Quick Build Successful”) message appear in the bottom right.  This is when the Primary language has finished building.  You will then see “Sync Locales Started” message indicating the interaction model has been copied to the other locales for the same language.  Shortly you will see additional “Build Completed” messages as each additional locale is built.

Tweaking a Dialect

Keep in mind that each dialect is considered a completely separate interaction model.  The Developer Console just does some of the grunt work for you by copying the JSON and rebuilding.  If you want to change all the interaction models at once then change the Primary and all will be changed.

However, say you want to tweak the interaction model for one dialect to add support for some local terms, but the majority of the model is the same and you don’t want to maintain two completely separate models.  Once the Primary model is updated, saved, copied to the Secondary models, and built, then you can tweak one of the other dialects by itself by editing just that one locale.  This will only change the single dialect, not the Primary or any of the Secondary ones.  You will have to do another build for the one dialect but that is all.

Testing Multilanguage Skills

Testing multilanguage skills in the Developer Console can be a long process.  You need to set the proper language in the top left corner of the screen, then test your interactions using the selected language.  It makes for a large QA load to do the testing but it is worth it to maintain the quality of your skill.
By |2022-07-18T10:19:54+00:00July 16th, 2022|Alexa, AWS|0 Comments
  • Read Write S3 From CSharp

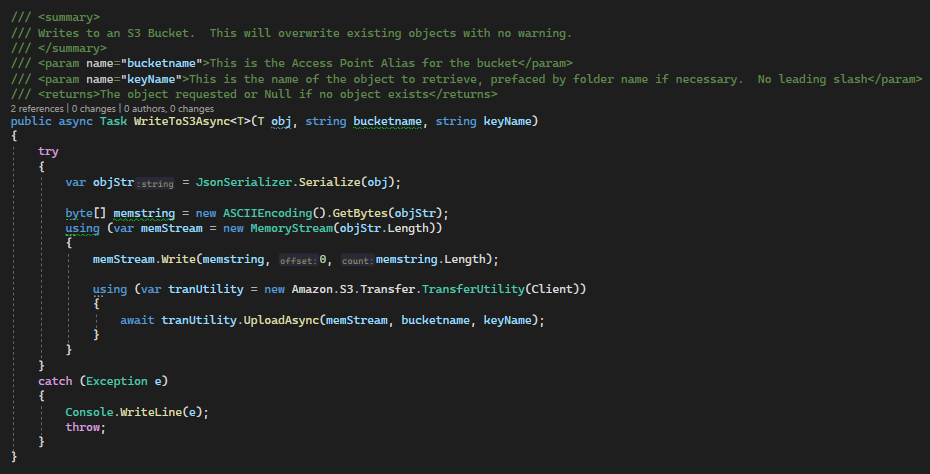
Reading and Writing S3 from C#

S3 is a convenient storage area for any non-structured data you may need for your app.  It’s fast, easy, and convenient to use, but getting the bucket setup correctly and the read/write code to work takes a little effort.

Anxious?  Want to just get the code and go?  Here’s a gist.

Bucket Setup

The first thing to do is create your S3 bucket to hold the data.  I like to create a bucket per application then add folders to organize the data, but creating separate buckets if also an option.  The thing to consider is that permissions are granted by bucket so if someone has access to a bucket they have access to all folders in that bucket.  If you have data that needs different access permissions you need different buckets.

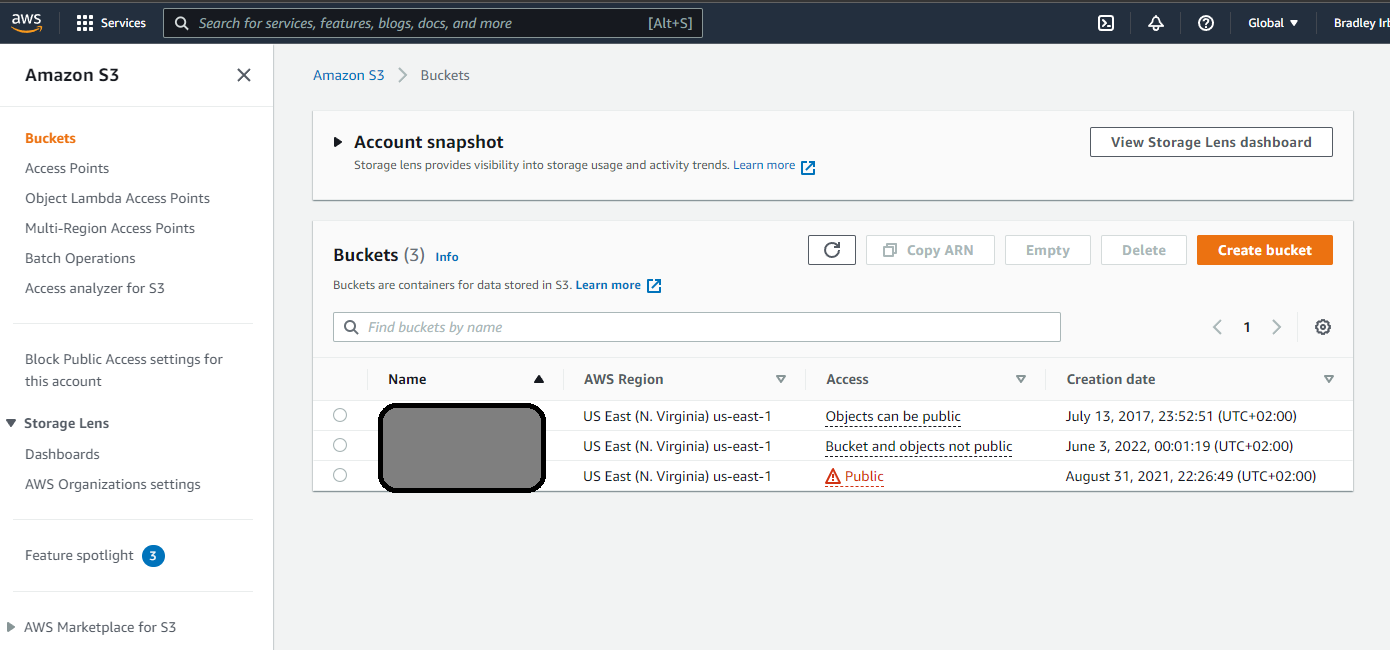
Go to the S3 console and press Create Bucket.

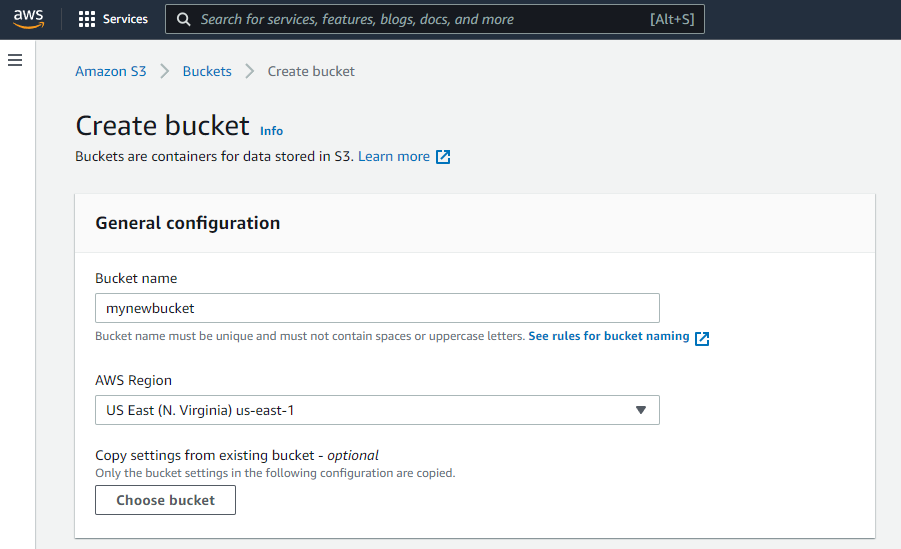
Create S3 Bucket

Set the Bucket Name and AWS Region, then click Create Bucket.  You can leave all the options at their default values.

Make note of the region since you will need it in the code later.

Set Bucket Options and Create

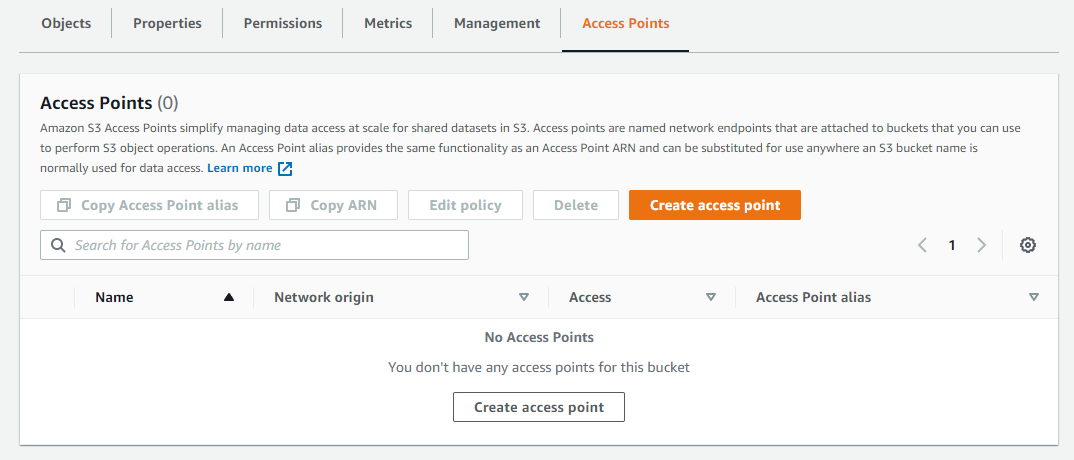
Click on the new bucket to edit the settings, then go to Access Points.

Add S3 bucket access point

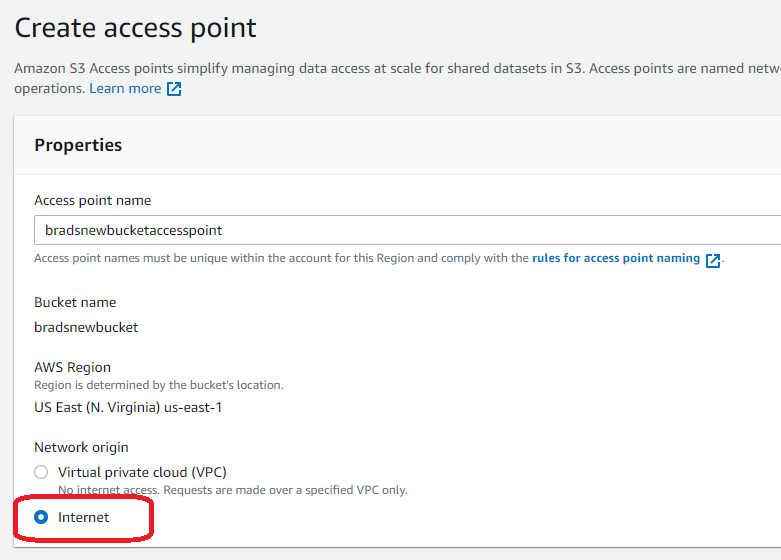
Create the new access point.  You can take the defaults except for the Network origin which must be Internet.  When you’re done click Create Access Point.

Make note of the Access Point Alias.  This is what you will use for accessing the data, not the name of the access point itself.

Access Point Details

Permissions

So now we have a bucket but your code cannot access it until we setup permissions.  We access the data using an AccessKey and SecretKey generated in the Identity and Access Management console.  If you already have an AccessKey and SecretKey for an existing user you can use those, just make sure it has sufficient S3 permissions.  To read and write data you need AmazonS3FullAccess permissions attached to the user.

If you do not have a user or want to create a new one, keep reading.

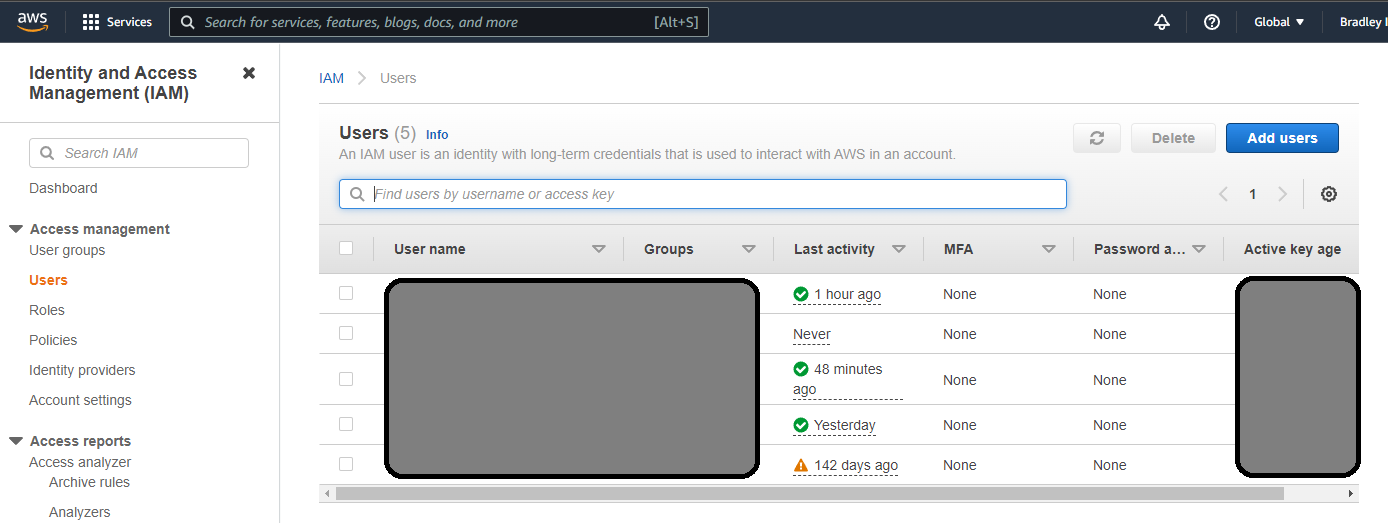
Go to the Users tab of the IAM console and click Add Users.

IAM Users Console

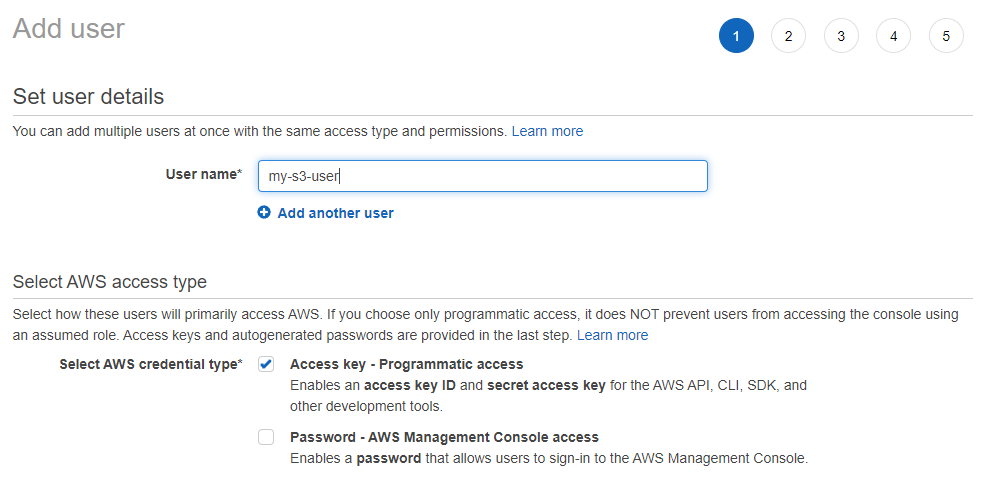
Add the username and check the Access Key option.

IAM Console Username Definition

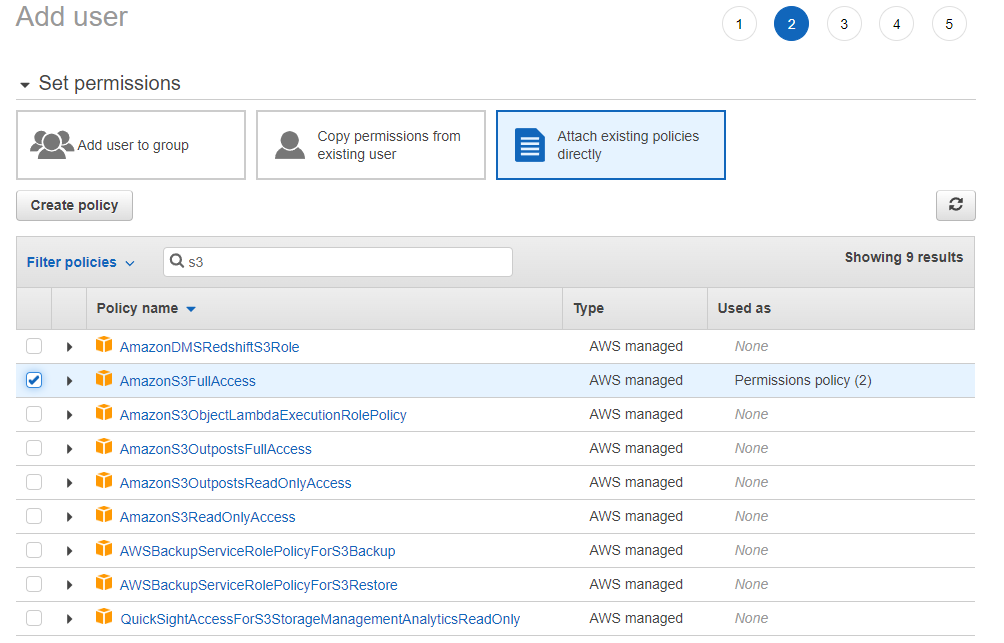
Choose Attach Existing Policies Directly and set the necessary permissions.  Choose the most restrictive option you can while still getting the job done.  Since we are reading and writing we will choose full access.

Click through the next few screens and create the user.

IAM Console Setting User Permissions

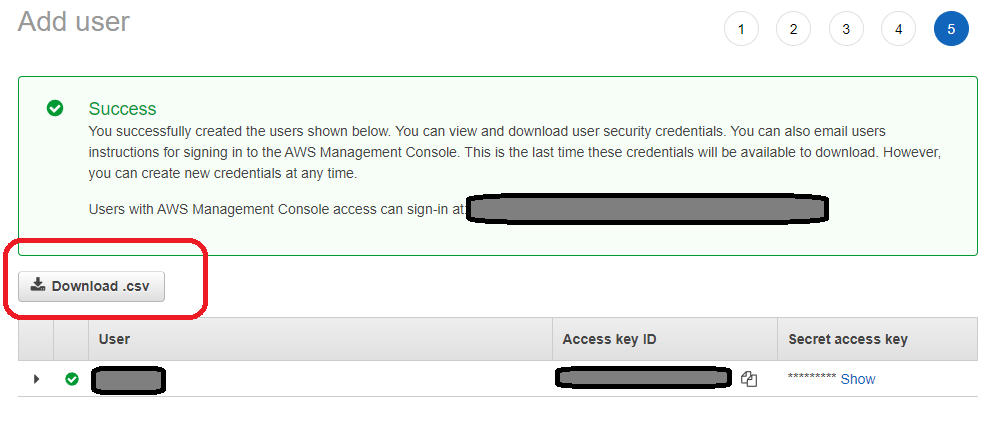
The final screen will give you the AccessKey and SecretKey you need.  This is the only time you will ever see the SecretKey so download the CSV and save it off someplace secure.

Accessing the Data

Now that the bucket is setup and we have access, we can move to the code that accesses the data.

For security reasons, we are going to put our AccessKey and SecretKey in environment variables and read from there.  If you are setting up a Lambda that needs access to S3, you can set environment variables for the Lambda as well.

Note that you will need to install the Amazon SDK for this code to work.

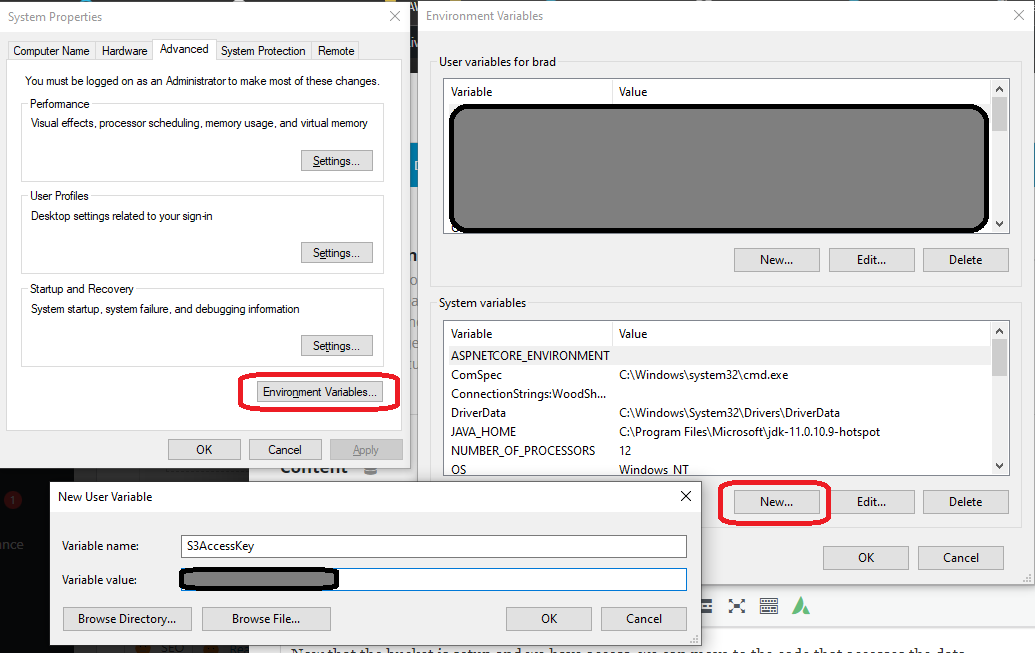
On Windows you can set the environment variable by pressing Start and typing “env”.  That will find the environment variable editor, and you can add the entries by pressing Environment Variables -> New.

If you are using Visual Studio remember you must exit and restart to access these new variables.  This is probably true for VSCode and other editors as well.

Create Environment Variables in Windows

I use a separate service for accessing S3 so I can inject it where I need it.  In the service there are only 2 methods and a constructor.

The constructor looks like this.  It just creates an AmazonS3Client for use by the methods that read and write the data.  The accessKey and secretKey parameters are the ones we just created, and the regionEndpoint is where you created your bucket.

S3Service Constructor

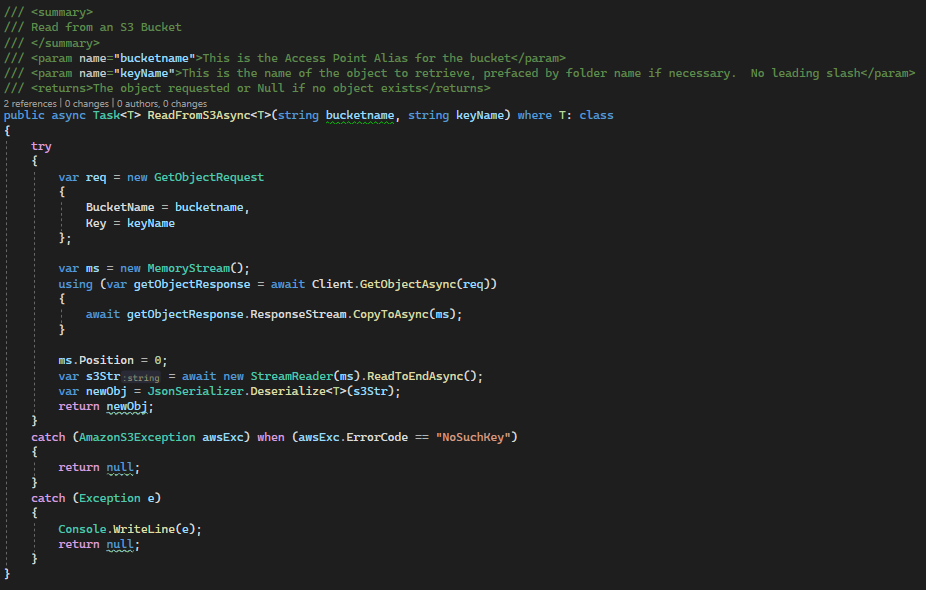
The read method takes the Access Point Alias we created earlier and the name of the object we want to read.  Assuming the S3 file is json for an object,  I also deserialize the json into the proper object.

S3 Service Read method

The write method takes similar params in addition to the object to write.

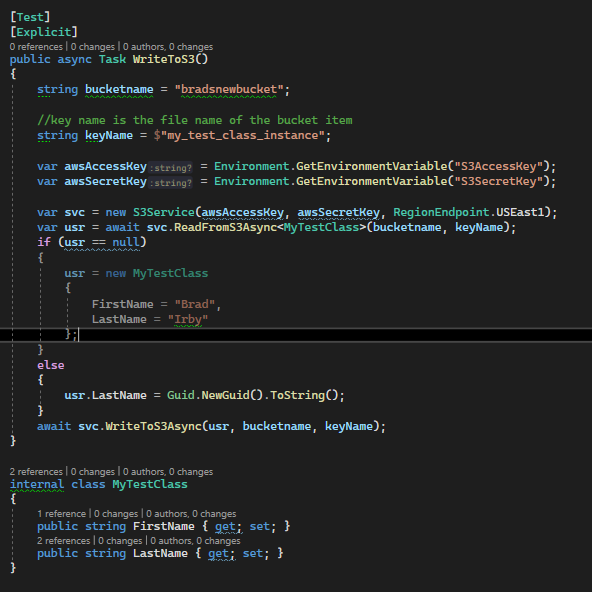
And finally, here is a test that will read the object from S3, update it, then write it back.

You can check to see if the test worked by going to your bucket, click on the file name, and download.

If you don’t like to type, here is a gist with the code above.

By |2022-06-03T10:05:08+00:00June 3rd, 2022|Alexa, AWS|0 Comments

Alexa Slots Explained

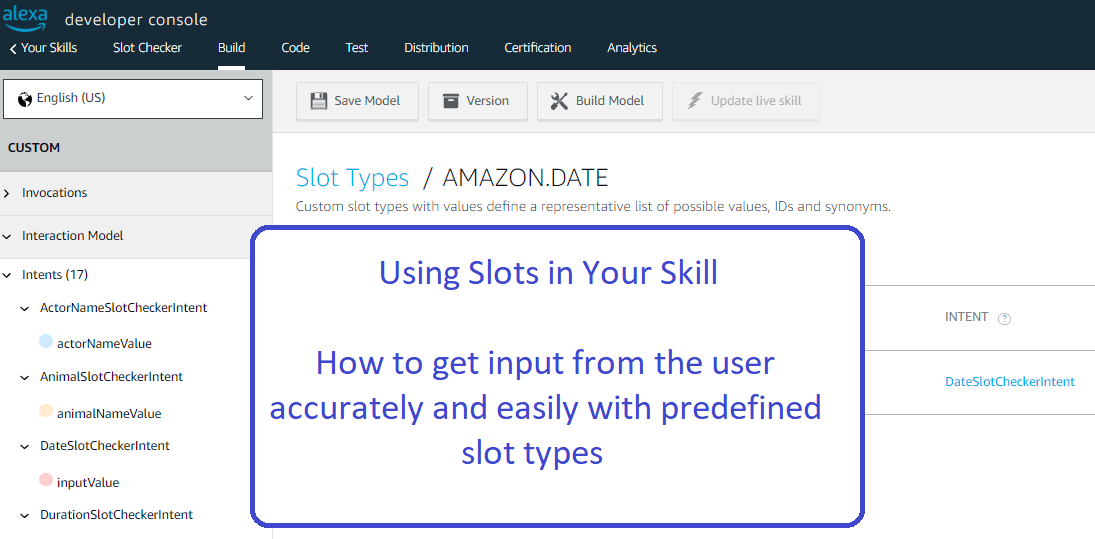
When building a skill for Alexa you need to be able to get input from the user.  All but the most simplistic business logic is going to have variables for completing the users desire.  For Alexa, these variables are called Slots.  Just like a variable in a strongly typed programming language these Slots must be declares and given a type so that the user can provide the data.  This post will talk about how Slots work and how to use them in your skill.
There are basically two types of slots you can use in an Alexa skill.

  • Value types, like numbers, dates, times, etc.
  • Lists of items (i.e. multiple choice)

There is actually a third type called Phrases but Phrases are complicated types of slots that open the door for more responsive skills, such as search queries.  Keep an eye on my blog for a full writeup on Phrase slots in the near future, but we will not be getting into those today.

Value Types

The available Value Types are limited to whole numbers, phone numbers, and several variations on date and time.  Aside from the pick lists, these are all the options you have.  Specifically, the options are

  • Dates – the user can give a specific calendar date or a descriptive phrase like “this Wednesday” or “first of next month”.  Your skill will receive a slot value of the specific date
  • Duration – this is for a span of time, like when you set a kitchen timer with your Echo.
  • Numbers – this supports positive and negative whole numbers, not decimals.  There is also a special type of slot called Four Digit Numbers that is useful for years, PIN codes, and such.
  • Ordinal – if the user says “second”, your skill gets a 2
  • Phone Numbers – many different formats are supported including U. S. local 7 digit numbers, numbers with area code, and numbers with country code
  • Time – you skill gets the time the user stated in 24-hour format where midnight is “00:00”.  It also supports certain terms like “Midnight” or Noon.

Date Types

When I say Alexa supports “date” you may think it’s limited to YYYY-MM-DD, but that would be a mistake.  Alexa supports many different permutations of date so you must be prepared to interpret each because you cannot control what the user says.  When you declare that your slot accepts a date, you can get any one of the formats described here.

If the user says a specific calendar date, the value will be returned to your skill in ISO 8601 format, which is just YYYY-MM-DD except for some special cases when using different languages and locales.

Date slots can also accept descriptive words like “tomorrow” “today”, “next Tuesday”, “Christmas”, etc.  Your skill will just receive the specific date without knowing how they described that date.  If they use a descriptive term for a date then it will always be interpreted as being in the future.  If they say “Monday”, it’s next Monday.  If today is Monday, then you get today’s date.

The user is also allowed to specify a week, such as “this week”.  In that case you will get the week date format instead of calendar date.  The week format is in the form YYYY-WNN where YYYY is the year and NN is the week number.  For example, the first week of 2022 is 2022-W01.  The descriptive terms are limited; for example “last week of the year” will get no response, nor will “the week of February 1”.  However, “this week”, “last week”, and “next week” are reliable.

Weekends work the same way as weeks but you get a “-WE” tacked onto the end.  The first weekend of the year would be 2022-W01-WE.

Asking for a month will return the month in the format YYYY-MM if you are using a form of English or YYYY-MM-XX when using some other languages.  For example February will be either 2022-02 or 2022-02-XX.

Years work the same way as months except you will receive just the year, such as YYYY or YYYY-XX-XX, depending on your language setting.

The user can also specify a decade such as “this 90’s”, in which case you will receive the string 199X or 199X-XX-XX.

Finally the user can specify a season as Spring, Summar, Fall, or Winter.  Your skill will receive the year then a season modifier, like 2022-SP, 2022-SU, 2022-FA, or 2022-WI.

Your skill can never tell what kind of date will be returned, so when you are coding for a date be prepared for any of these options.

Duration Types

Duration slots return a time span in a special format.  An example of duration use is in setting cooking timers on your Echo.

Duration returns a value in the format “PnYnMnDTnHnMnS” where P means “duration” and then the number of years, months, days, hours, minutes and seconds.  Note the “T” in the middle that marks the transition from days to time.  This may seem unnecessary but it is necessary to detect the difference between Months and Minutes.  If your timespan is 9 Months you will receive “P9M”, but for 9 Minutes you will receive PT9M.

In theory if the user says “two years one month eight days four hours nine minutes and three seconds” you should receive the string “P2Y1M8D4TH9M3S”.  However large durations like this can be unpredictable.  When I tried the utterance above I got 4 different values as follows

  • P2Y
  • P1M8DT4H
  • PT9M
  • PT3S

From the point of view of my skill, the user gave me 4 different durations for one slot.

Number Types

There are two number types you can use depending on your purpose – Numbers and Four-Digit-Numbers.  There is very little difference between the two except that the Four-Digit-Numbers is a bit better at recognizing PIN numbers and other types of codes.  It is also better at treating the “oh” as a zero when the user says something like  “six oh nine nine”.

Note that the Four-Digit-Numbers name is a misnomer because it will return any number of digits, not just 4.  If you specify a number in the millions for a Four-Digit-Number slot, you will still get the whole number. Same as for a 1 or 2 digit number, you will get what the person said.  In daily use, I’ve noticed very little difference between the two.

The Number slot type can handle positive and negative whole numbers, but not decimal numbers.  If you try to say “seven point two” you will often get a question mark back, but sometimes just one or the other of the two numbers.  If you need to get a decimal number input, you will need to work at it.

Ordinal Types

Ordinals are “first”, “third”, etc.  When you specify an Ordinal slot your skill will receive the integer representing that word.  There’s not much more so say about ordinals.

Phone Numbers

The phone number recognition can be powerful, recognizing everything from local numbers to overseas.  However, there is no enforcement for phone number format.  If someone speaks a number without enough digits, you will get that incorrect number.  It’s up to you to validate the format and ask for the information again.

The user can specify the country code, area code, and local phone number, including saying “plus” before the country code if they wish (it’s not required).  If they say “plus” your skill will receive the “plus”.  If they do not say it, you will not get it.  Other than the plus, you will not get any punctuation in the number – just the digits.

The phone number slot value seems to be more of a simple regex enforcement for the proper allowable characters of numbers and “plus”.  Beyond that you are on your own to validate the incoming number.

Time Values

Time values are received in 24 hour format where midnight is “00:00”.  The values are always in HH:MM format for all language settings.

The user can also specify a time period like Evening (your skill will receive the string “EV”), Night (“NI”), Morning (“MO”), and Afternoon (“AF”).

Something to keep in mind is when I said “midday” with an en-US locale I was given midnight, not noon.  I have not tested whether this would be recognized properly in a different locale.

List Values

All the rest of the built in slot types, as well as any custom slot types you may create, are all lists.  There are many types of predefined lists, and you can see them all here.   Below is a list of the 90+ items that were available when I wrote this article.

  • Actor names
  • AdministrativeArea
  • AggregateRating
  • Airline Company names
  • Airport
  • Anaphor (“this”, “that”, “those”…)
  • Animal
  • Artist Names (in various media like Music, Literature, Art, etc.)
  • Athlete Name
  • Author Name
  • Book Title
  • Book Series
  • Broadcast Channel (commercial name of TV and Radio stations, such as KEXP or Colorado Public Radio)
  • City Name – Cities in the U. S. and well-known cities world wide
  • Civic Structure – Well known landmarks and local buildings
  • Color
  • Comic
  • Corporation
  • Country
  • Creative Work Type – things an artist would make, like book, soundtrack, thesis, sonnet, song, etc.
  • Day Of Week
  • Dessert
  • Device Type – not just Amazon devices, but also laptop, stereo, TV, etc.
  • Director Names
  • Drink Names – brand names, drink names (including alcoholic drinks)
  • Educational Organization – college and other educational institution names
  • Event Type – such as game, holiday, party, time off, meetup, etc.
  • Festival – specific names of festivals like South by SouthWest, Sundance, Montreux Jazz Festival, etc.
  • Fictional Character
  • Financial Service Business Names
  • First Names common in the U. S.
  • Food
  • Food Establishment
  • Game
  • Genre
  • Landform
  • Landmarks Or Historical Buildings
  • Language
  • Local Business
  • Local Business Type
  • Medical Organization – names of local and national companies
  • Month Names
  • Movie Titles
  • Movie Series
  • Movie Theater
  • Music Album
  • Music Creative Work Type – Words describing different types of musical works, such as songs and tracks.
  • Music Event
  • Music Group
  • Musician names
  • Music Playlist – generic types of music lists, such as Dance, Classic Rock, etc.
  • Music Recording – album names and song names
  • Music Venue
  • Music Video
  • Organization – non-governmental companies
  • Person Names – real and fictional names of people
  • Postal Address
  • Professional – names of well-known people from sports, business, Literature, Music, etc.
  • Professional Type – names of professions
  • Radio Channel
  • Region Names within the U. S.
  • Relative Position – “bottom”, “middle”, “right”, etc.
  • Residence names – well-known residences
  • Room Names – “Living room”, “library”, “nursery”, etc.
  • Screening Event – film festivals
  • Service – services companies provide their clients
  • Social Media Platform – names of the MANY social media platforms available
  • Software Application Names – includes business software, games, etc.
  • Software Game
  • Sport Names
  • Sports Event
  • Sports Team
  • Street Names
  • Television Channel
  • TV Episode – names of individual episodes of popular series
  • TV Season
  • TV Series
  • Video Game
  • Visual Mode Trigger – “show”, “display”, “see”, “view”,…
  • Weather Condition
  • Written Creative Work Type

They also provide a list of country specific terms for certain countries.

  • Australian Cities
  • Australian Regions
  • German City
  • First Names common in Germany
  • German Regions
  • General European City Names
  • UK Cities
  • First Names common in the UK
  • UK Regions
  • U. S. City names
  • First names common in the U. S.
  • U. S. State Names

Just as for the Phone Number and Four-Digit-Number slot types, these lists are not restrictive.  I found that the Actor Names slot would recognize musicians and politicians.  When I tried to make it recognize the actor name “pitt” it returned the name to me but in all lower case.   When I said “Brad Pitt” it returned with proper casing making me think the name was recognized.  Each list appears to favor recognizing words in its topic, but did not enforce it.

For any one of these built in lists you can also add your own values to the list when you configure your skill in the interaction model.

Custom Values

Though these lists are convenient, they are not sufficient for everyones needs.  Therefore you can define your own custom slot value list that your users will choose from.  This is done in the interaction model definition but describing the technical part of that is a whole post of its own.

By |2022-07-19T21:31:31+00:00April 1st, 2022|Alexa, AWS|0 Comments
  • Lifecycle for Solo Developers

Alexa Skill Lifecycle for Solo Developers

Getting started with a new Alexa skill is not complicated but the lifecycle of a skill is different than for normal development.  It is easy to make missteps that can lead to problems after release.  If not done correctly fixing small bugs in production can turn into a much bigger effort than necessary, and you also run the risk of accidentally overlaying production code with test code.

This is a lifecycle that has proven itself over the years to be flexible yet not too formal.  It is meant for a development process with no dedicated QA resources so if you are a solo developer and also do your own testing, this is the process for you.

Creating the Alexa Skill

We are going to go through the lifecycle I use for my production Alexa Skill Exact Measure, including how I first created the skill and how I do ongoing maintenance and feature releases.

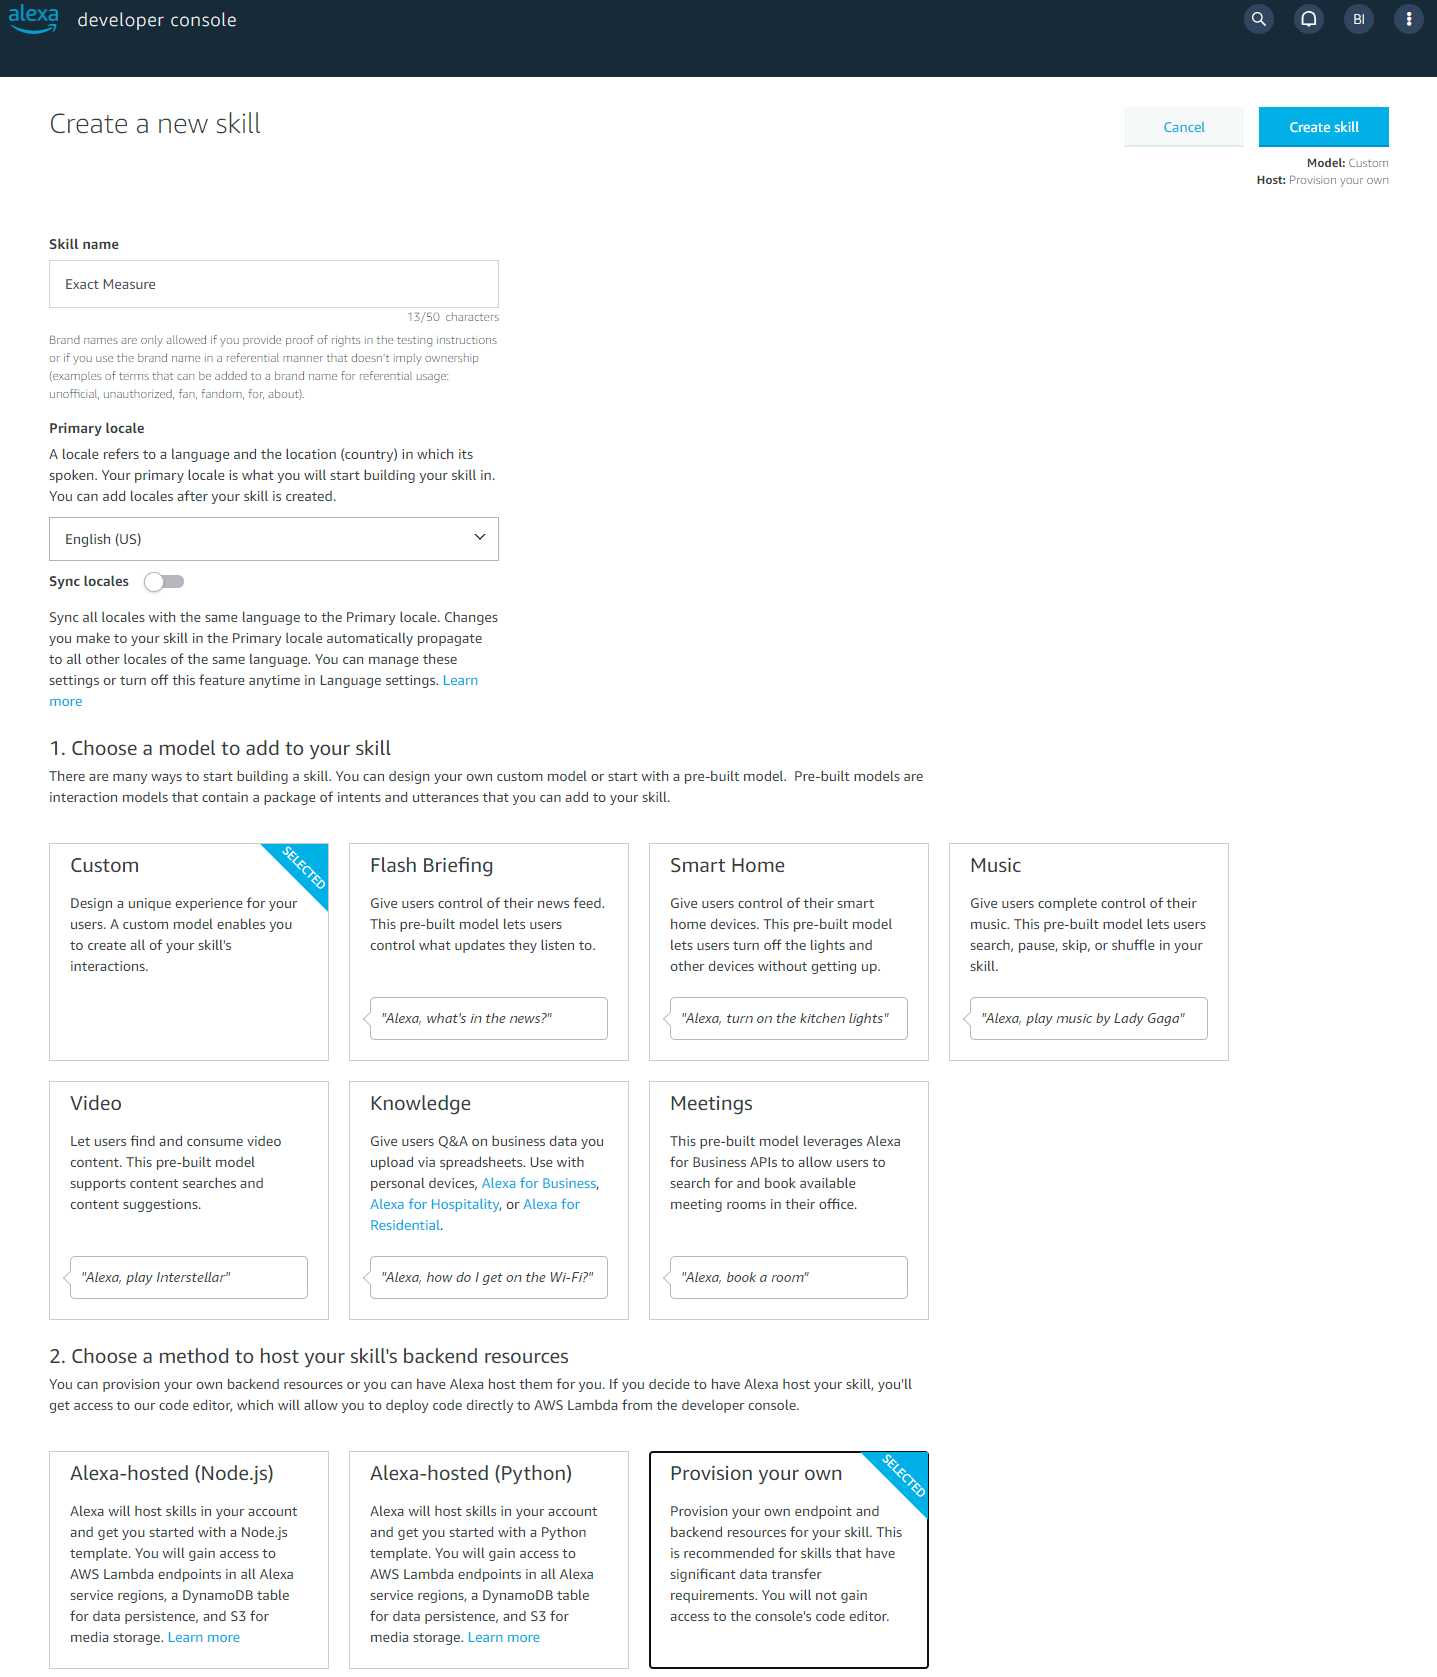
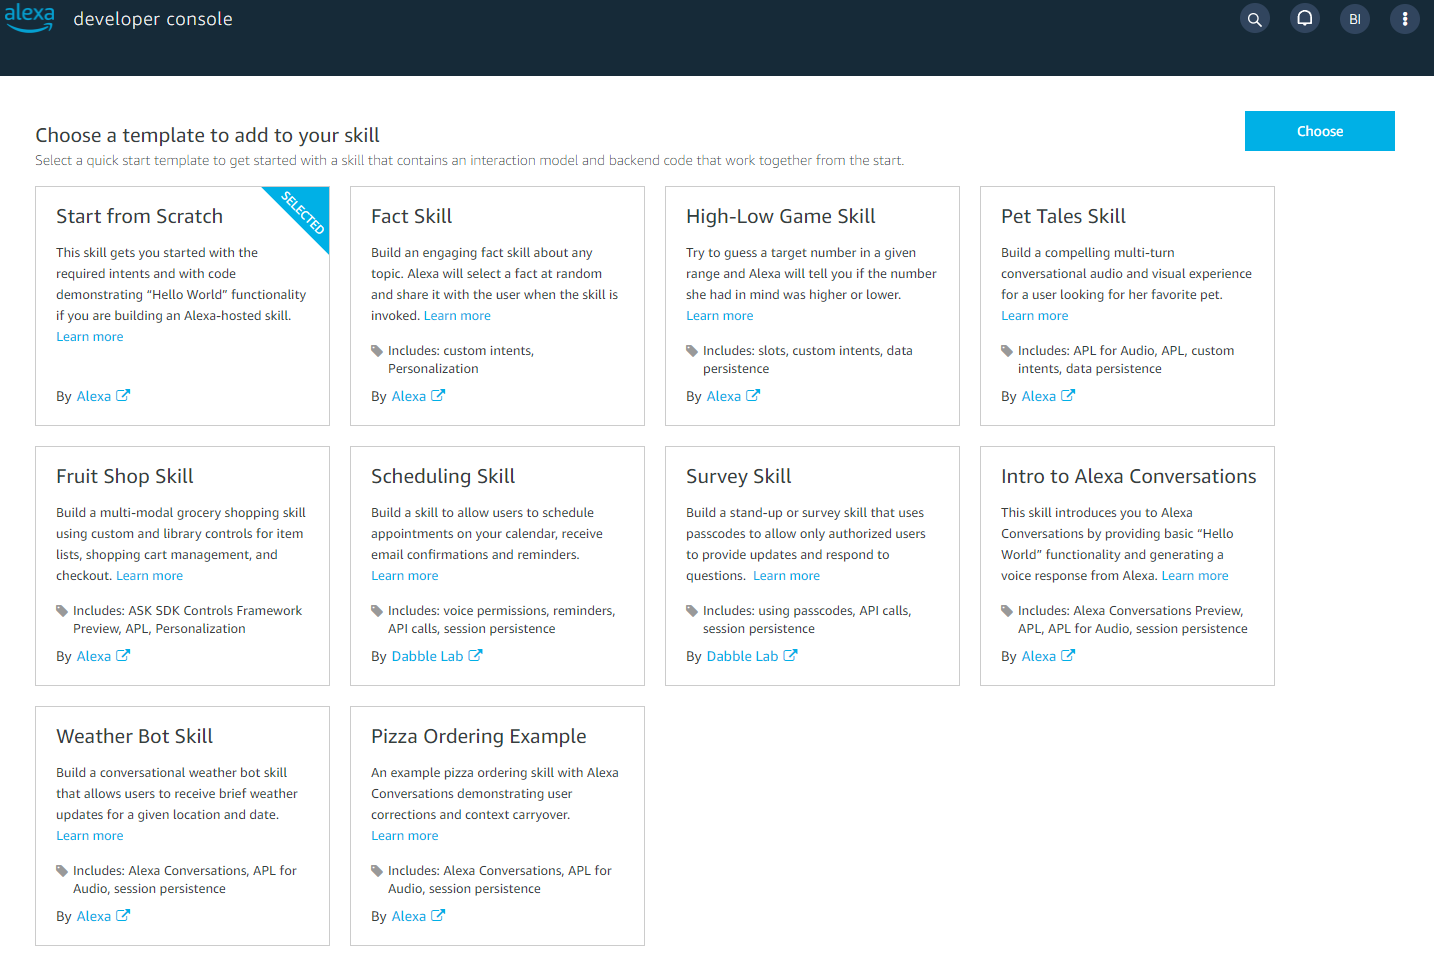
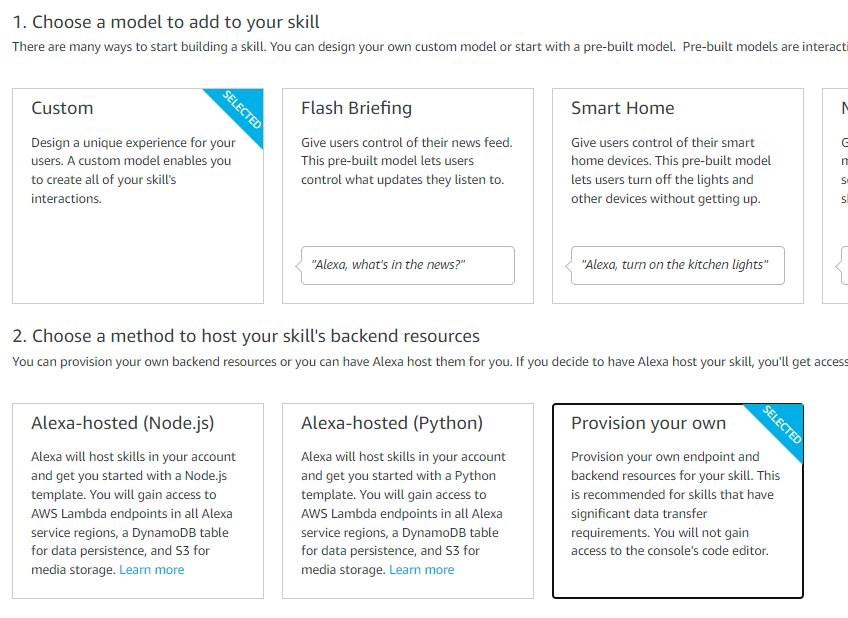
First we create our new Alexa Skill.  Open the Alexa Console and click the “Create Skill” button.  For this exercise we will choose a custom skill and to provision our own and to start from scratch.

Lambda Function Creation Screen

Creating the Lambda

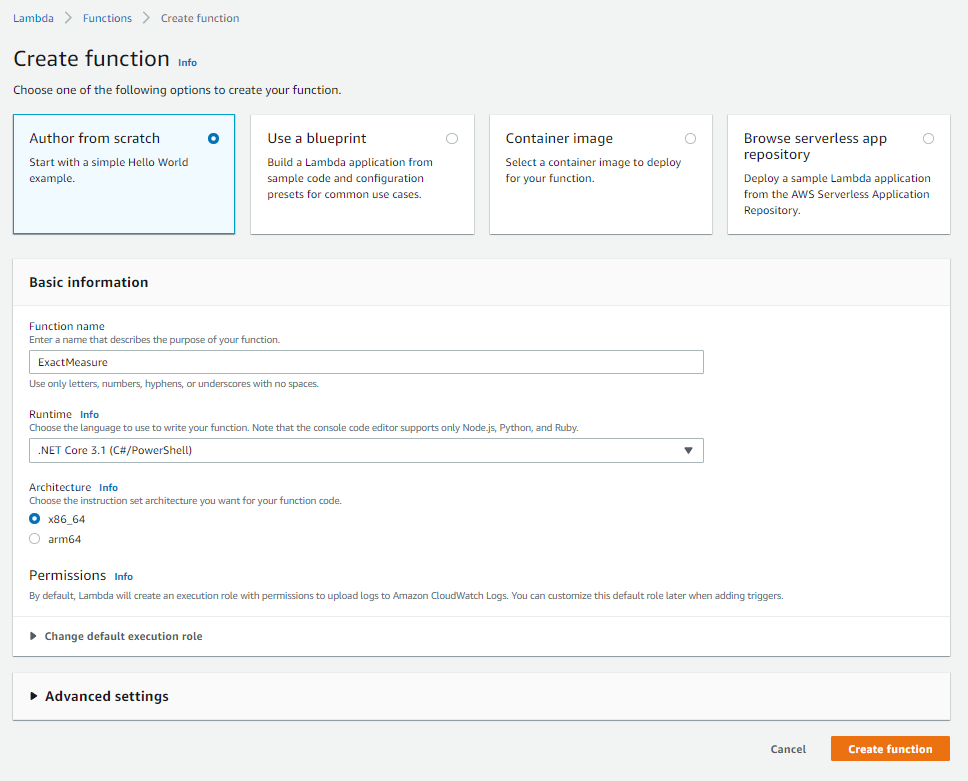
Now we create our new Lambda by opening your Lambda Home page and press “Create function” to get the screen shown below.  Configure your Lambda appropriately and press Create.

I will be using .NET Core but the language you use is not important.

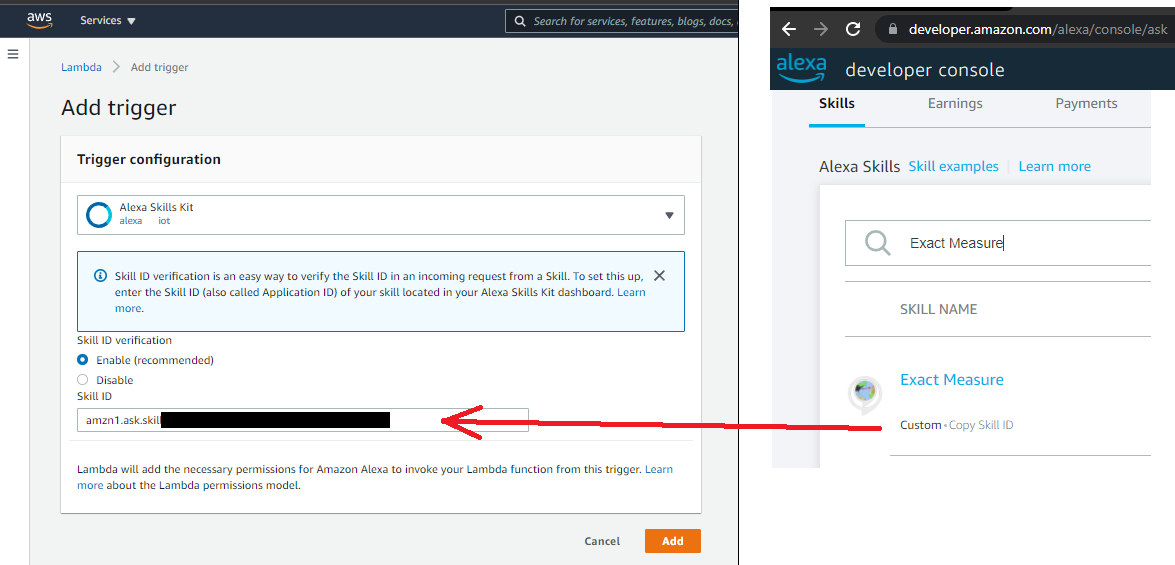
Once the Lambda is created you need to add a trigger that it can respond to.  Click the Add Trigger button and choose the Alexa Skills Kit trigger.

It is best to keep the Skill ID Verification turned on because this limits calls to this Lambda to only those coming from your Alexa skill.  You can get your Skill ID from the Alexa Developer Console.  If you are just playing around, though, you can Disable the Skill ID verification.

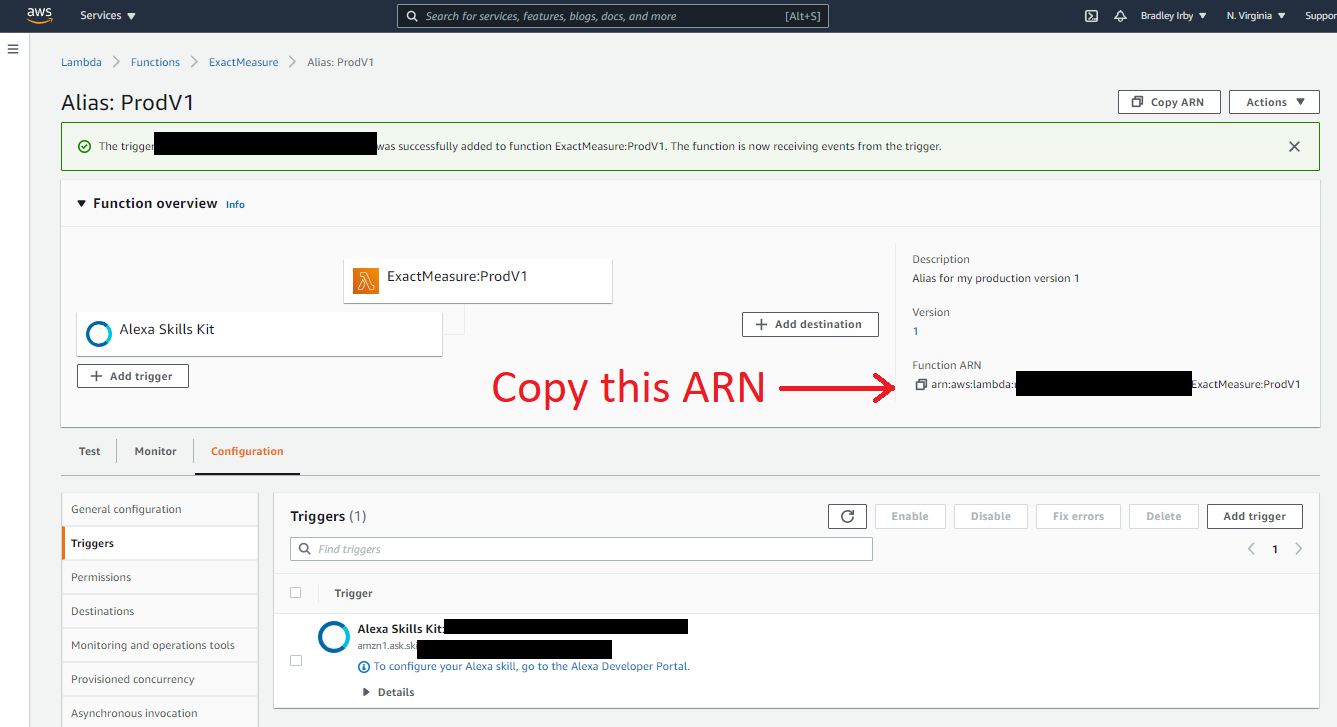
Copy the Function ARN for the Lambda because you will need it in the next step.

Lambda Function Creation Screen

Finish setting up the Alexa Skill

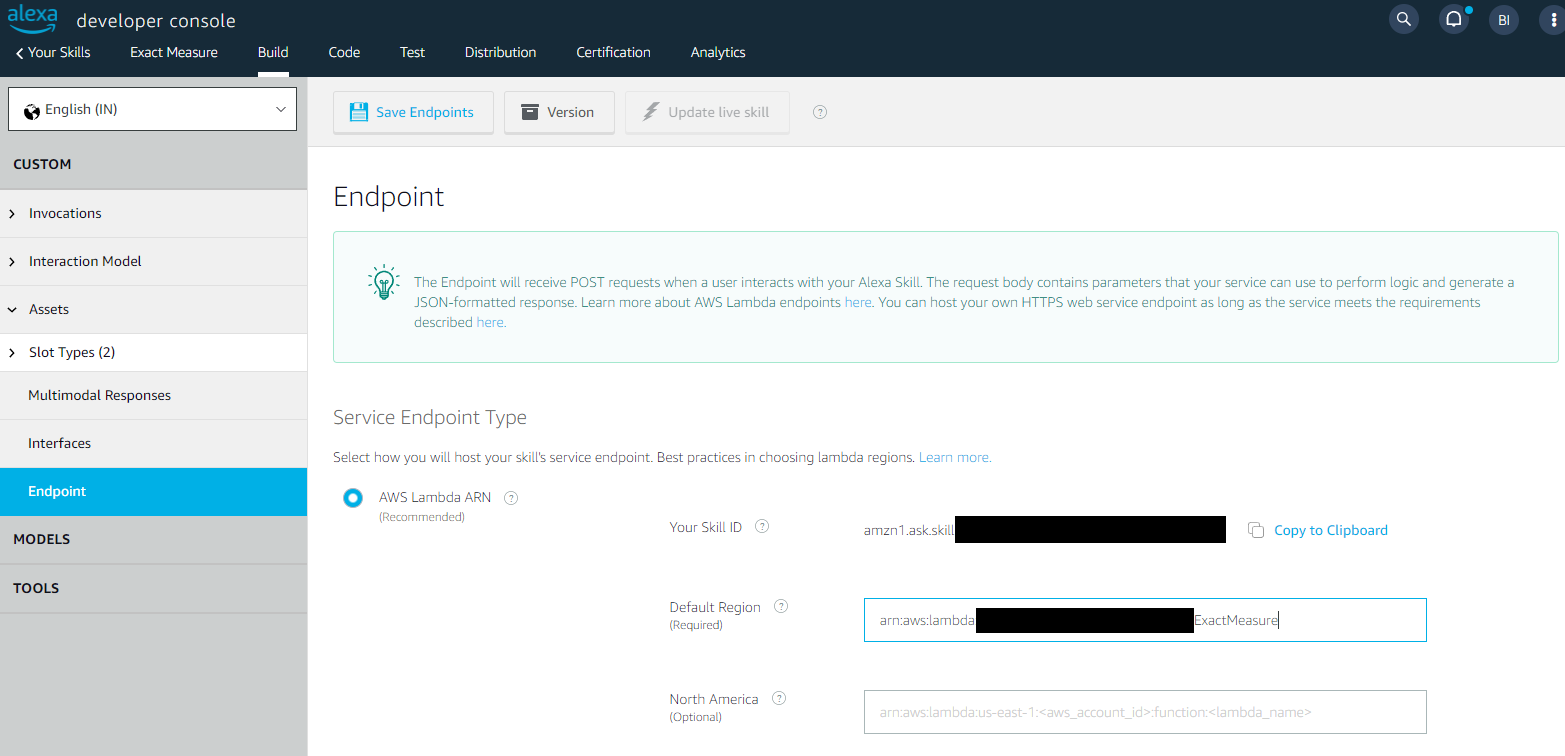
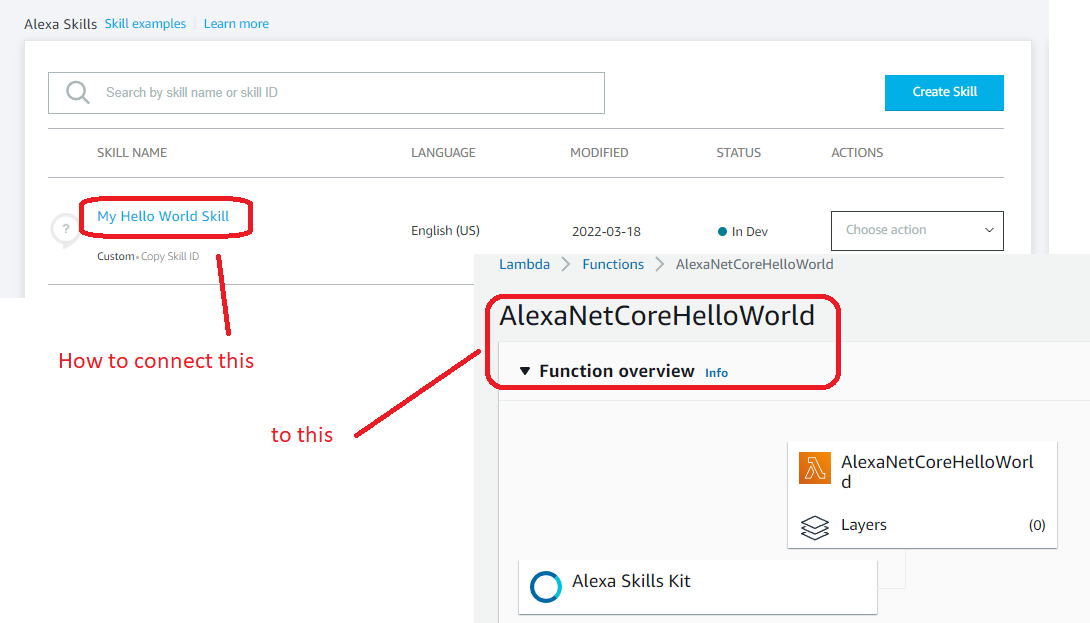
Now that your Lambda is created and configured to accept Alexa Skill requests, you need to connect your skill to the Lambda so Alexa knows where to send the requests.  Return to your Alexa Console and edit your new skill.  Go to the Endpoint configuration screen and add the Lambda endpoint.  The Endpoint can be found in the Lambda admin screen.

You are now ready to publish code and test your skill.
Lambda Function Creation Screen

Pushing to Production

Once you have your skill working correctly, you are ready for the “go live” part of the lifecycle.  Up to this point you have been developing and testing with the dev version of your Lambda, called $Latest.  You could go live with your skill pointing to this version but then you cannot update your Lambda with new code without changing production.  To get around this we create a new version of the Lambda we can use that will stay static through the continuing development process.

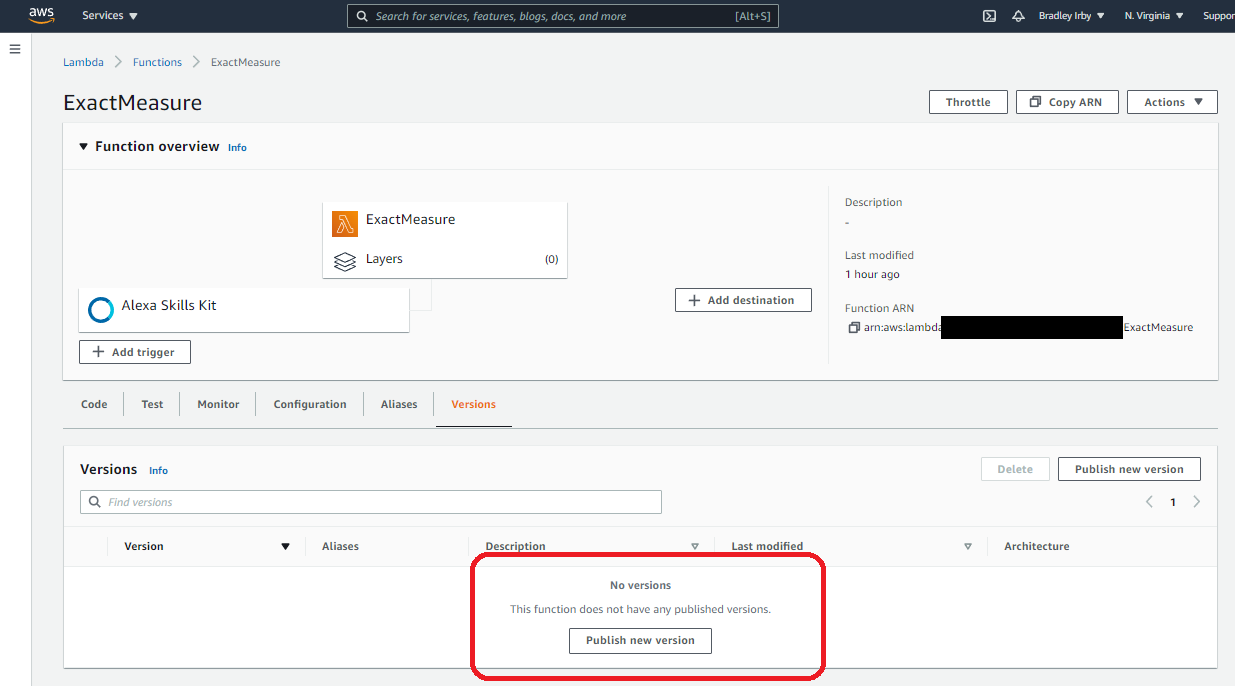
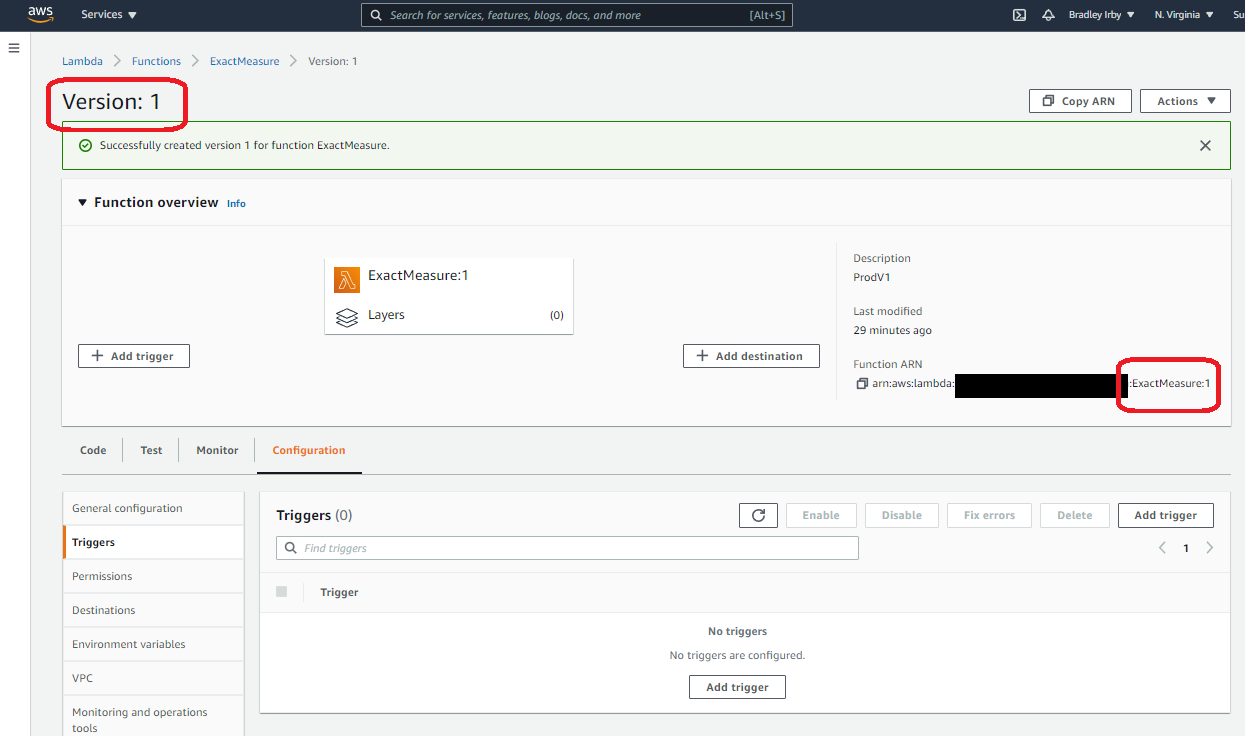
Publishing a new version of your Lambda is quite easy with the Versions tab of the Lambda function screen.  Just click the Publish New Version button and you will be asked for an optional description.  Enter something like “ProdV1” and press Create.  Now you will be editing Version 1 of your Lambda.  You can tell what version you are editing by the label in the top left corner, and also the Function ARN which now has a “:1” appended to it.

This version of your Lambda is now immutable.  It cannot be changed so when you publish your Skill using this Lambda you will never accidentally overwrite your code.

Notice that the version of the Lambda has lost the trigger you added to the $Latest version.  You need to add that trigger back just like you did when setting up the Lambda the first time.

Lambda Function Creation Screen

We are not quite ready for production, though.  If you publish your skill using this Version 1 directly, you are limiting your ability to handle small bugs that may come up later.  Anytime you make a significant change to an Alexa skill you need to resubmit it for certification.  Changing an endpoint counts as a significant change so to fix even the smallest bug would require a full recertification.  If we use an Alias, however, we can get around this.

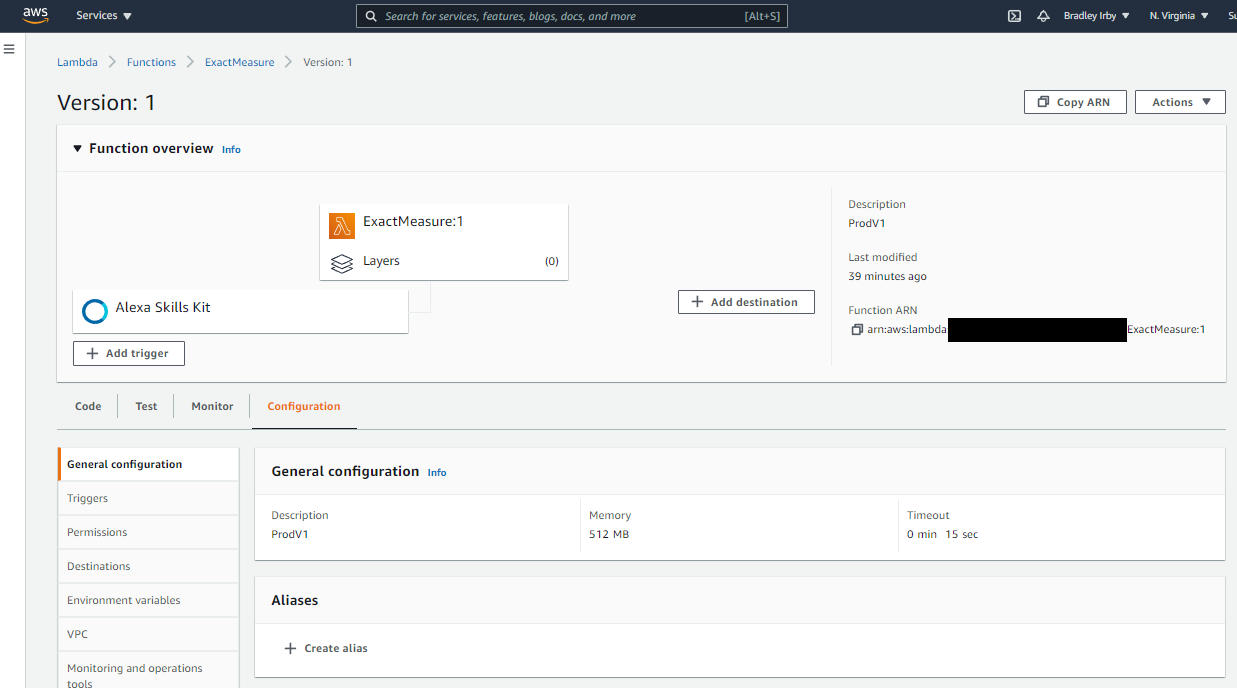
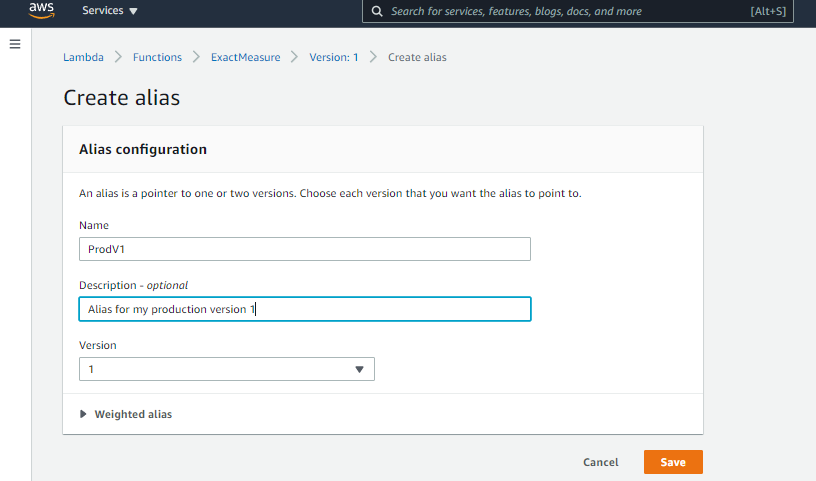
In your Lambda editing screen, choose the General Configuration in the left side menu.  Press the Create Alias link and enter a name, like ProdV1.  Make sure you point it at the proper version number (not $Latest).  We are going to ignore the Weighted Alias for now. Click Save and you will see your new Alias.  You must add the trigger one more time.

Note you did not need to add the trigger to the Lambda version itself like we did above.  You only need to add the trigger to the Alias.  I did so above for clarity and flow.

You should now see the fully configures Alias for the published version of your Lambda.

Lambda Function Creation Screen

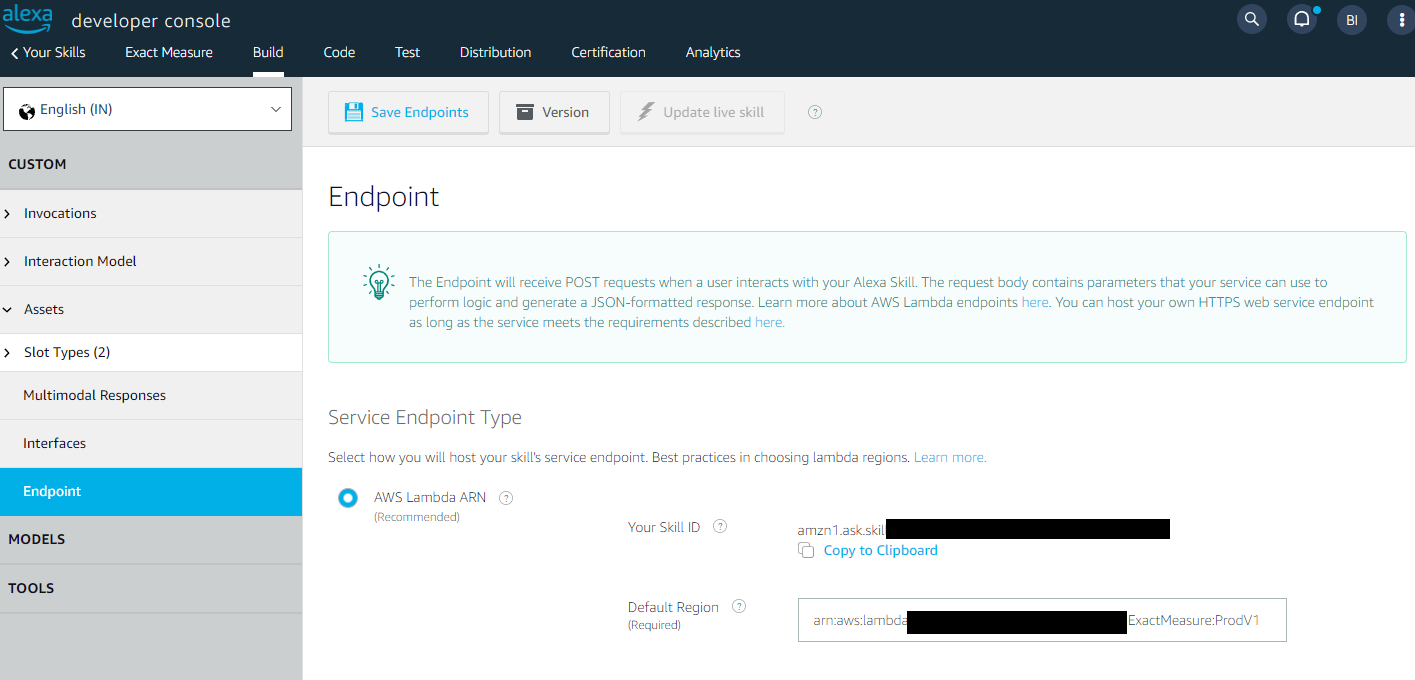
With our Alias ready we can update our Skill to point to this alias.  Copy the Function ARN for the alias and update the endpoint for the skill.  You are now ready to submit for Certification.

Lambda Function Creation Screen

After Getting Certified

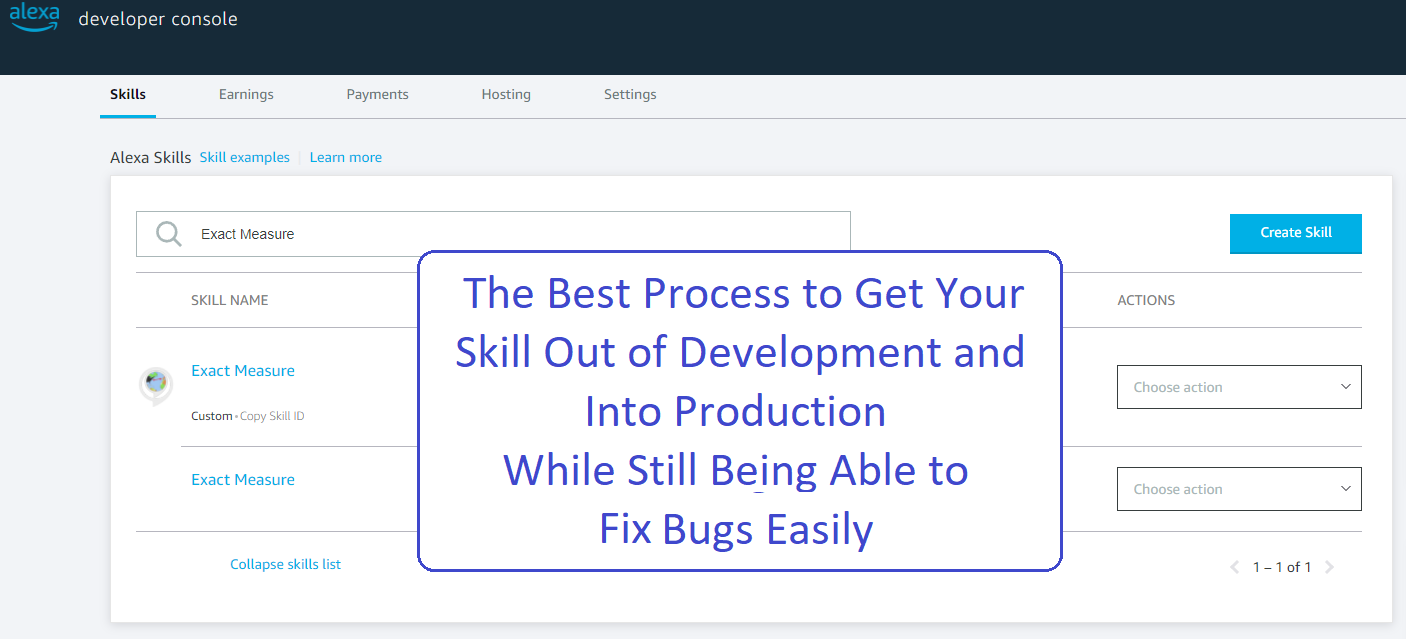
After you have gone through the certification process for your skill, you will see 2 nearly identical skills in your list.  One has a status of Live and the other In Dev.

The Live skill is read only – all you can do is view or delete it.  The In Dev version is the one you use when continuing development.

Initially both of these skills point to the same ProdV1 endpoint.  In order to continue development on your skill, you must edit the In Dev skill and point it back to the $Latest version of your Lambda so it will get the new code changes.  Once that is done you are ready to continue working on your next feature release.

Lambda Function Creation Screen

Fixing Small Bugs

Fixing small bugs in production is a simple process thanks to our Alias.  Edit your Lambda code and publish to $Latest as needed.  When your bug is fixed create another version of your Lambda as described, then change your Alias to point to the new version.  Your skill is instantly updated with no need for recertification.

This works if the bug is just in the Lambda function.  If your bug fix includes any changes to the Skill configuration, you will have to go through a full feature release in order to fix it.

Releasing a New Feature

Releasing a new feature is a bit more involved than a bug fix due to the recertification process needed.  The process for the Lambda function, however, is the same as when fixing a bug.

Edit your code as necessary to add the new feature.  Also update the skill configuration as necessary.  By this time you should have changed the endpoint of the In Dev skill to point to the $Latest version of your Lambda.

Once your testing is done create another version of your Lambda.  Create a new Alias called ProdV2 or something similar and point at the new Lambda version.  Change your In Dev skill to use the new Alias, and submit for recertification.

The old version of your skill will continue to work while the new version is being certified.  If you chose to auto-release when certification completes, then the new version of your skill should become live within a few days of submission.

By |2022-03-18T14:11:41+00:00March 15th, 2022|Alexa, AWS|0 Comments

Connect an Alexa Skill to a .Net Lambda Method

Custom Alexa Skills can be implemented in many languages, but using .Net for the back end logic is my personal favorite.  Once you have a Lambda method defined and working using .Net, you create an Alexa Skill that uses that Lambda.  The process is slightly different from the one you use for the other languages, though.

Create the Alexa Skill

You begin by creating the Alexa Skill in the normal way.  Go to the Alexa Developer Console and click Create Skill.  Enter your skill name, but choose “Custom” for the model and “Provision your own” for the host method.  Then click Create Skill.

Create the skill

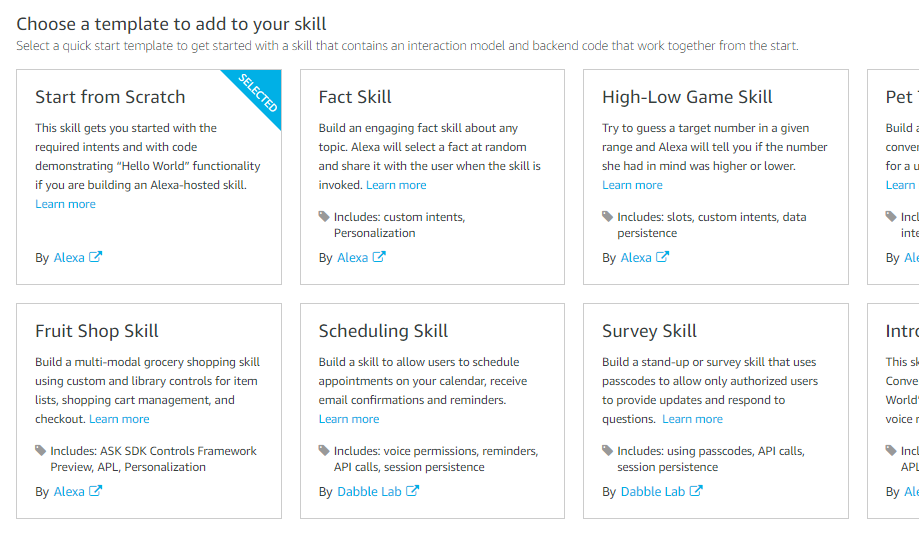
When asked to choose a template, choose “Start from Scratch”

When the process finishes you will be on the Build screen.

Lambda Function Creation Screen

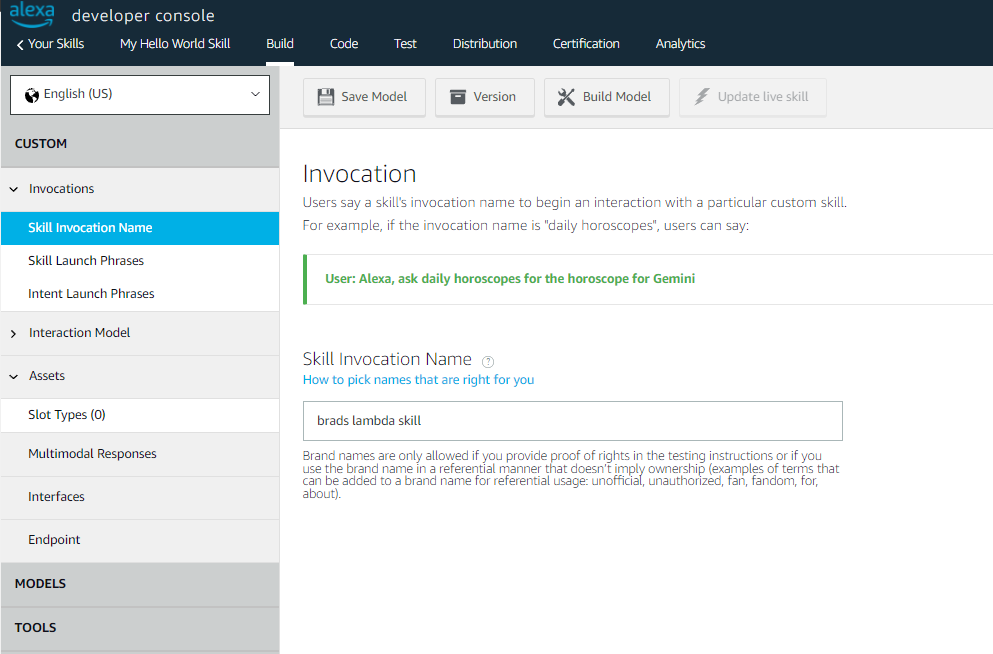
Choose the Skill Invocation Name and give your skill a name.  This is the name you will speak when you want to activate your skill.  For example, if we name it “brads lambda skill” we would say “Alexa, open brads lambda skill”.
When you are done click Save Model, then Build Model.

Avoid naming your skill anything with “Hello World” in it.  The Alexa Voice Services often confuses this name with the built in Alexa Skill “Hello World” and it will appear your skill is not working.

Lambda Function Creation Screen

The part that comes next is a bit of the chicken-and-the-egg.  We need a Lambda to assign to the endpoint of the skill, but we need a skill (and its ID) to grant permissions in the Lambda.

For now, copy the skill ID to the clipboard.

Lambda Function Creation Screen

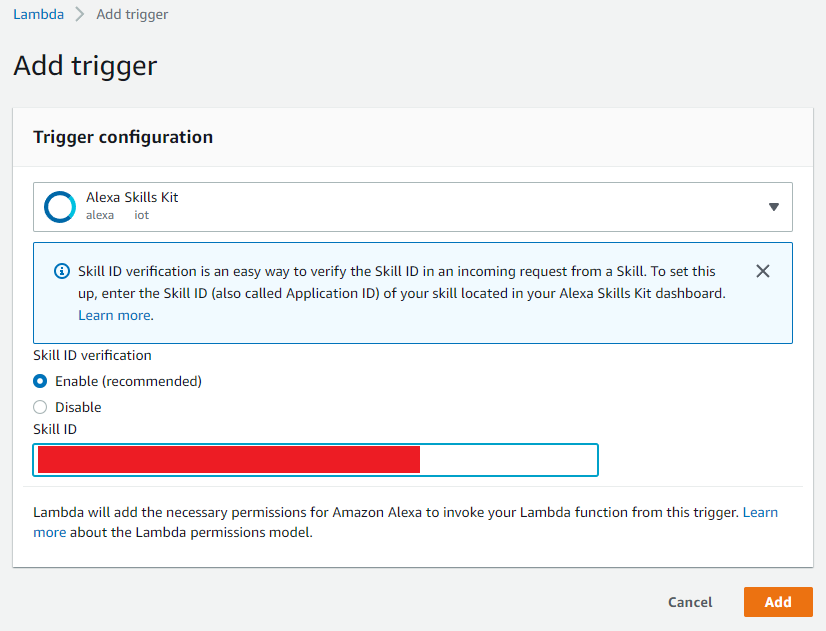
Go to the Admin panel for the Lambda you want to wire up to the Alexa skill.  Choose the Configuration tab and the Triggers sub-tab. Click Add Trigger and add the Alexa Skills Kit as the trigger.  Choosing this will also give you a box to paste in the Skill ID of the Alexa Skill you copied.

Lambda Function Creation Screen

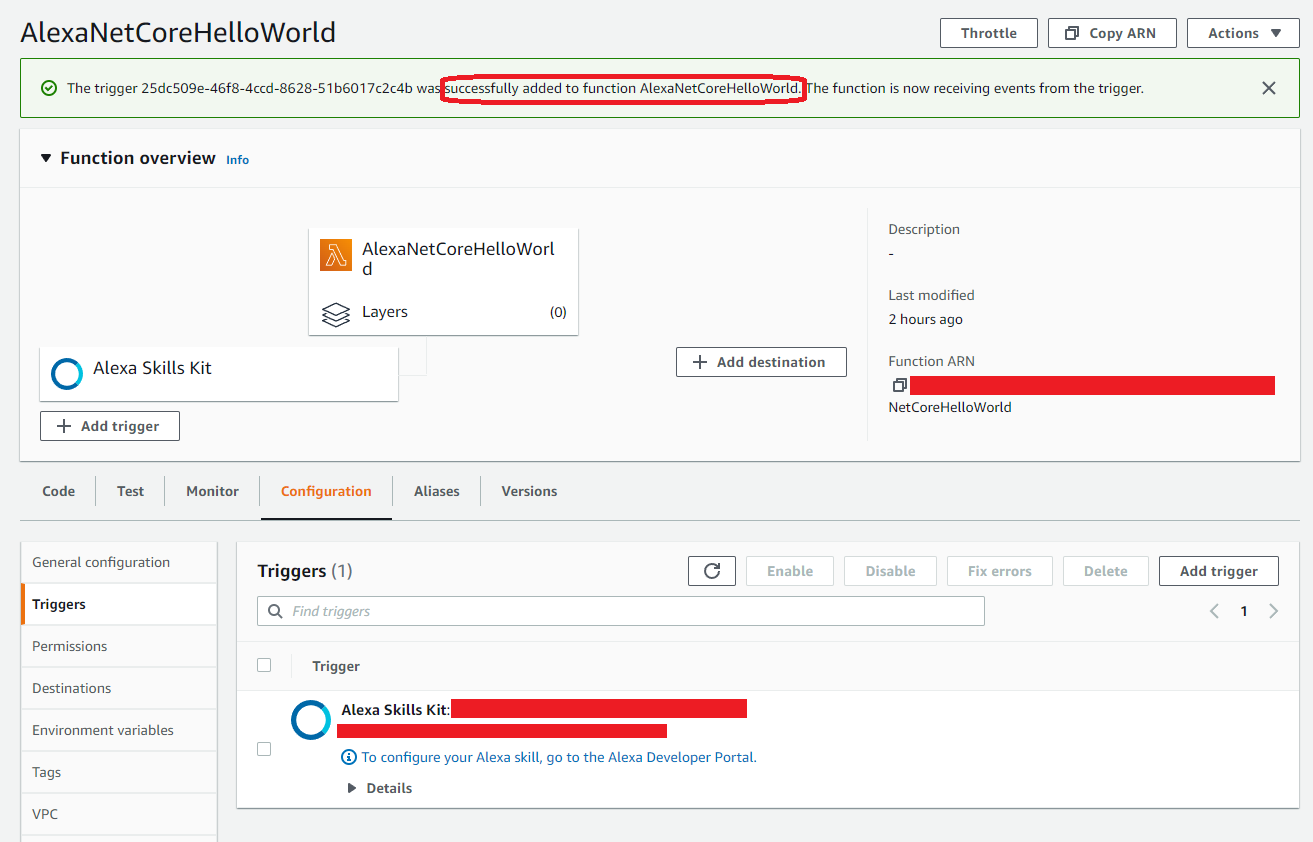
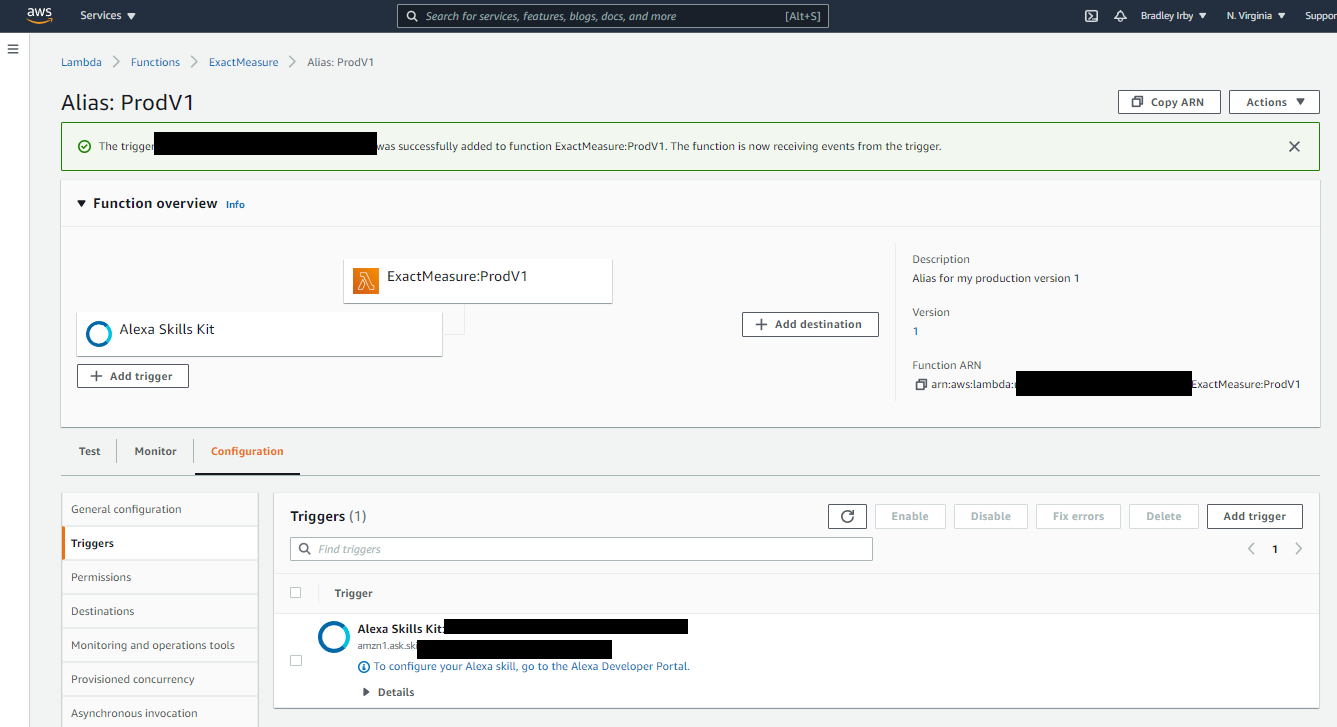
You should see a Success message and a new trigger associated with the Lambda.

What this has done is setup the Lambda so the Alexa Skill can call it.  However, we have not told the Alexa Skill what lambda to call yet.  We will do that next.

Lambda Function Creation Screen

Setting Endpoint in your Alexa Skill

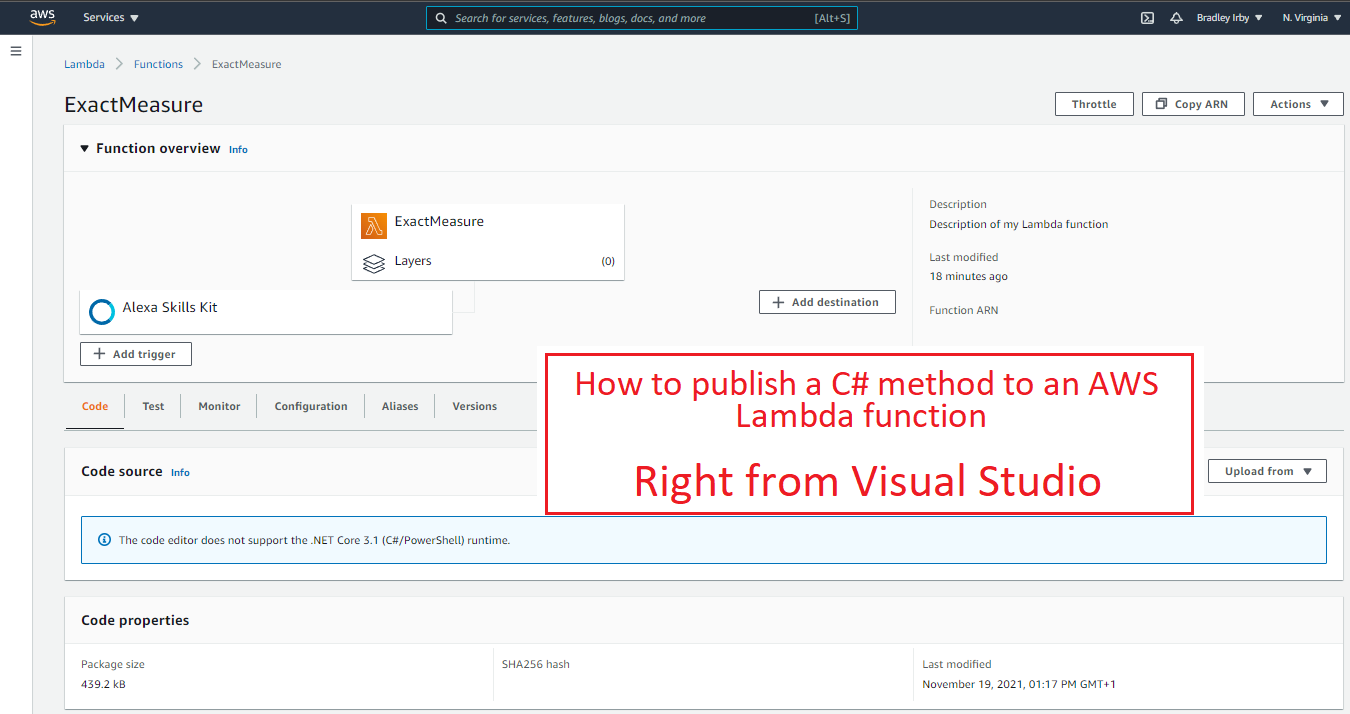
Copy the ARN from the Lambda you want to connect to your skill.
Lambda Function Creation Screen

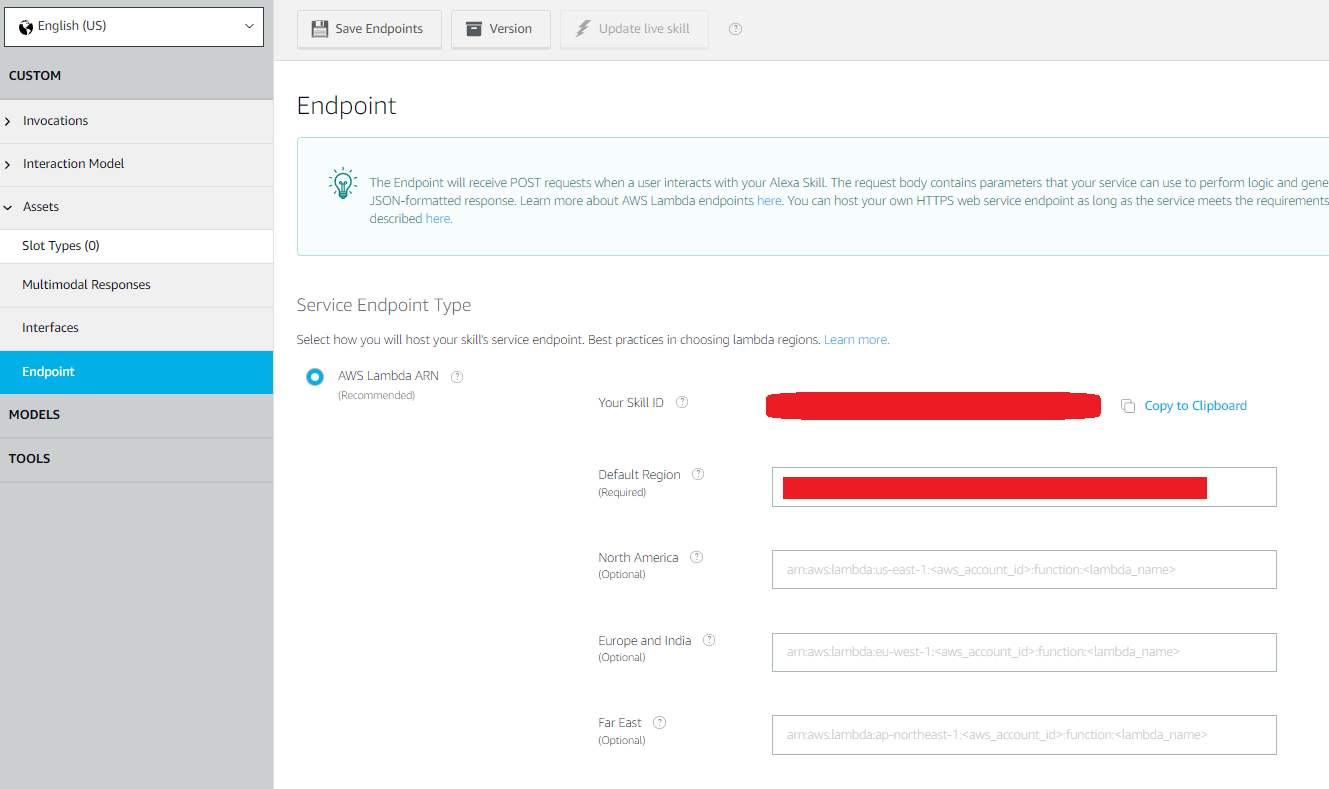
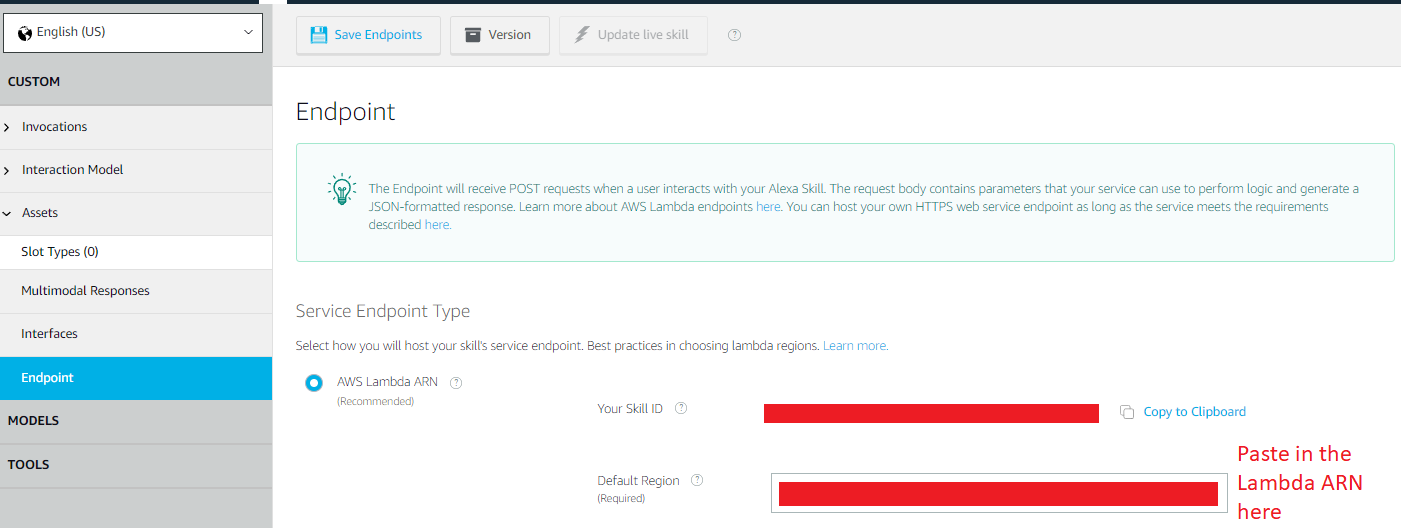
Return to the Alexa Developer Console where you were specifying the endpoint for your Alexa Skill.  Paste in the ARN from the Lambda into the Default Region box.  Save the endpoints.

Lambda Function Creation Screen

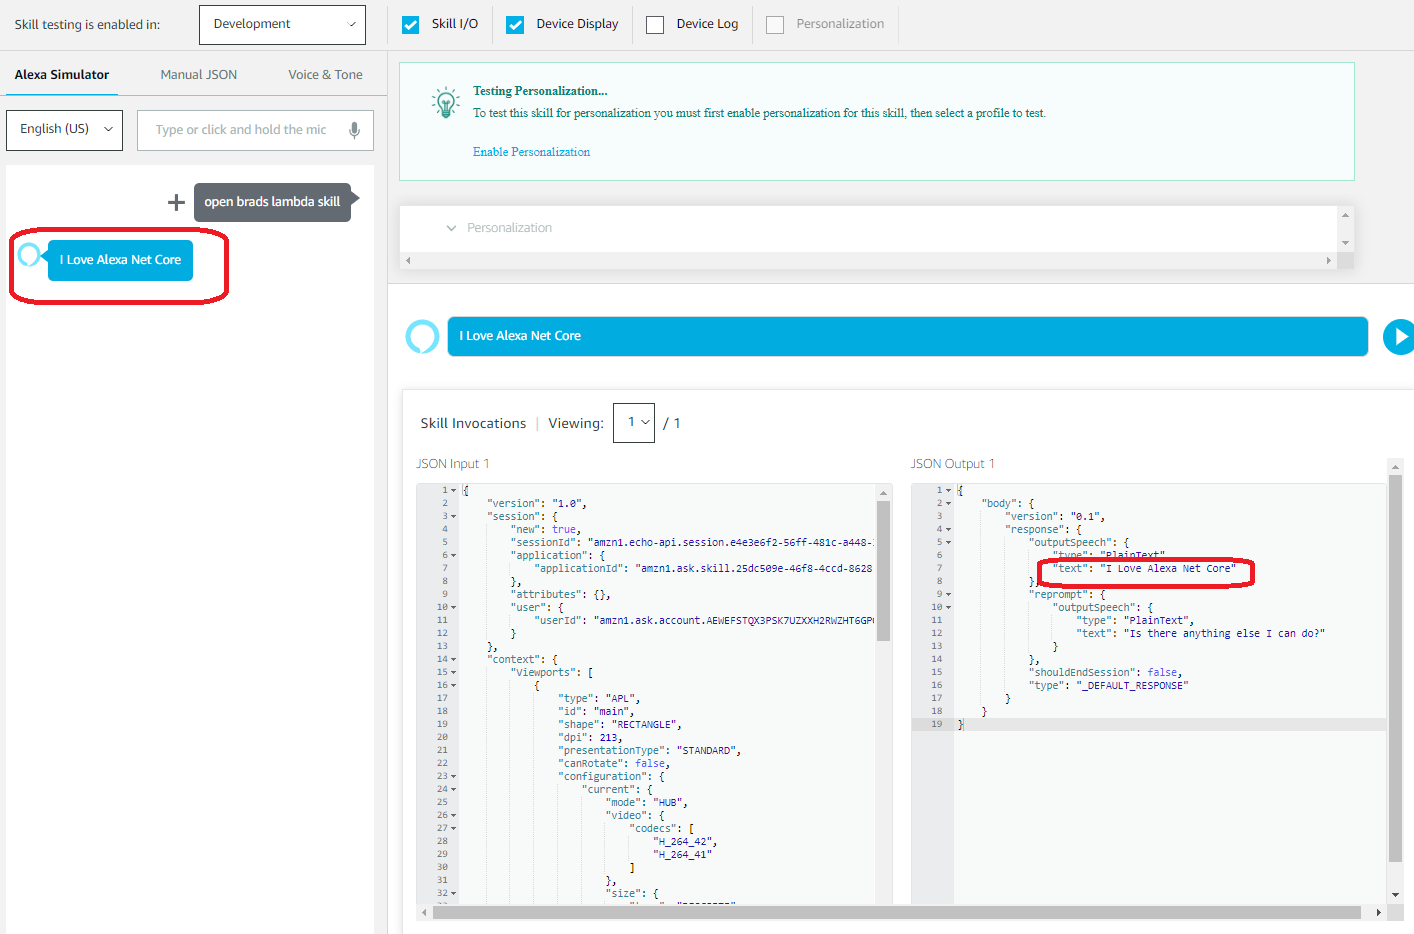
Now we can test our new skill against our Lambda.  Go to the Test tab in the Alexa Developer Console.  If you see “Test is disabled for this skill”, just set the combo box to “Development”.

At the top left corner, type in “Use {my skill}” where {my skill} is the name you gave to your skill.  For this tutorial, we called it “brads alexa skill” so we type that.  We should see the proper response from the lambda method.
Lambda Function Creation Screen

And that’s it.  Your skill is connected to your Lambda and is ready to go.

You can test your skill on any Alexa enabled device you own.  However it will only be available on devices that are connected to the AWS account that created the skill.  When you are ready to publish your skill for public consumption, check back here for how to do it.
By |2022-03-18T14:15:23+00:00March 1st, 2022|Alexa, Architecture, AWS|0 Comments
  • Publish a C# function to AWS Lambda from Visual Studio

Publish a C# Function to AWS Lambda using .Net Core 3.1 or .Net 6

Publishing a C# function to an AWS Lambda is not difficult.  Amazon has provided a Visual Studio add-in that does nearly all the work for you – as long as you get it setup correctly.  This is a short tutorial showing just where to get the different pieces of info you need to publish your method.

Lay the Ground Work

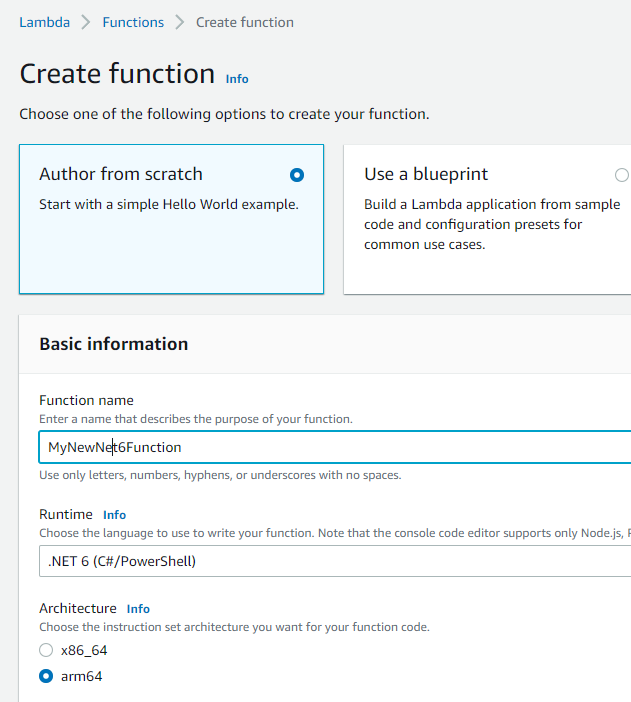
Create the new Lambda by opening your Lambda Home page and press “Create function” to get the screen shown below.  Configure your Lambda as shown in the image on the right, then press Create.

You may choose either .NET 6 or .NET Core 3.1, depending on your needs.  I run my .NET Core workloads under the arm64 architecture because it is less expensive to run, but choose the x86_64 if you like.

Create New Net 6 Function in AWS

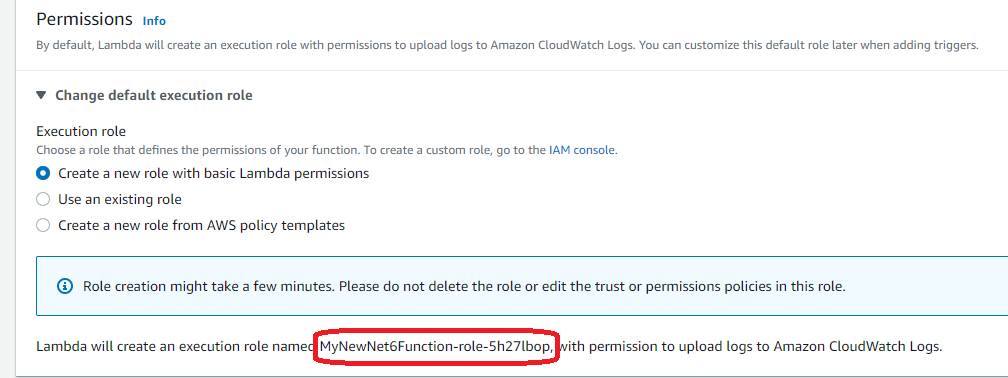
At the bottom of the Lambda Creation screen you will see an area for “Change default execution role”.  Expand that to see the options.

On the bottom of this screen you will see the name of the new Lambda execution role that will be created.  Make a note of this role name since you will need it later.

When you are done press the Create Function button.

Lambda Function Creation Screen

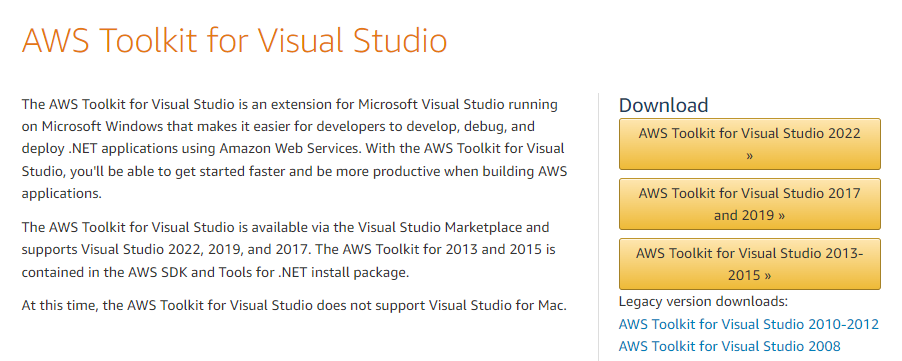
You will need to have the AWS Toolkit installed in Visual Studio.  In this example we are using Visual Studio 2022 so I have the 2022 version installed.  VS2019 users should install  the AWS Toolkit for Visual Studio 2017 (a 2019 version does not exist).

Lambda Function Creation Screen

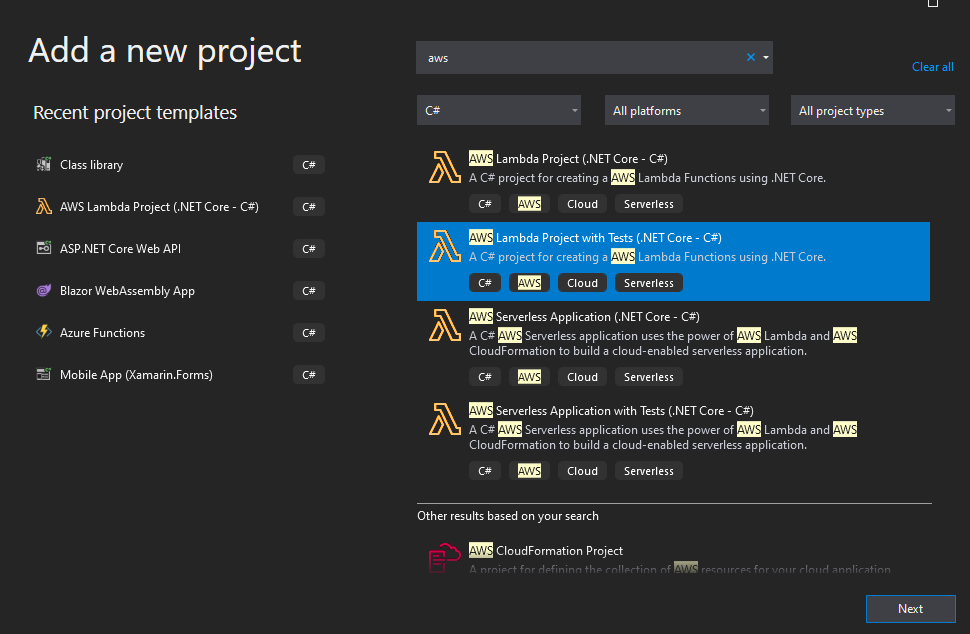
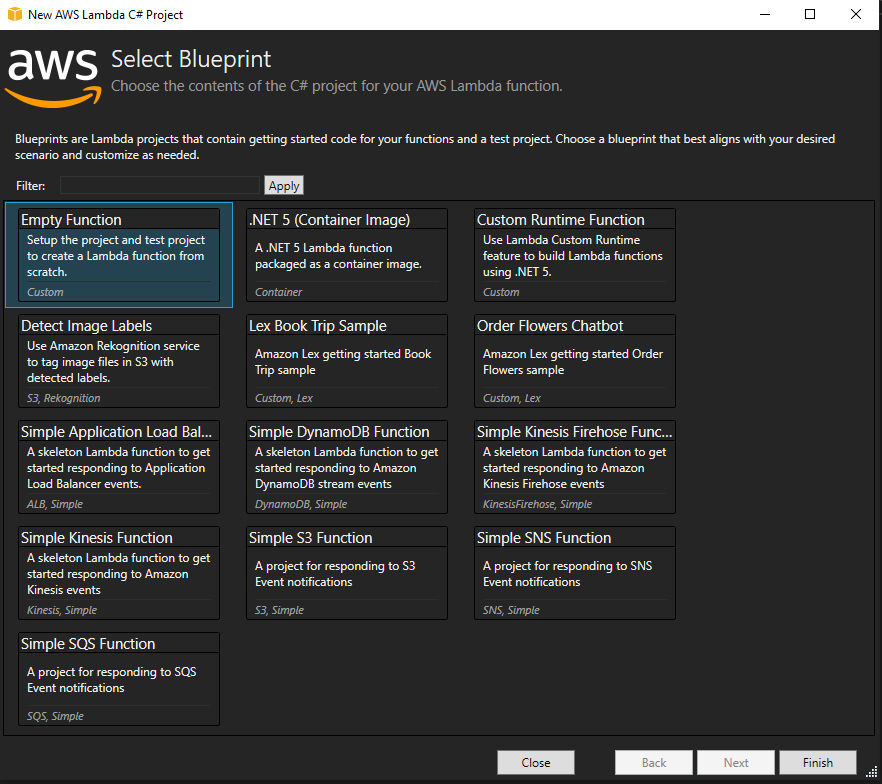
To publish a C# method to an AWS Lambda function all you need is a normal class library project.  However, the AWS tool provides a special project type that has a lot of the settings you need already wired up.  It provides a blueprint project (shown in the screenshot below) that allows you to choose many different kinds of functions.  For today, were just going to choose the empty function.

Lambda Function Creation Screen

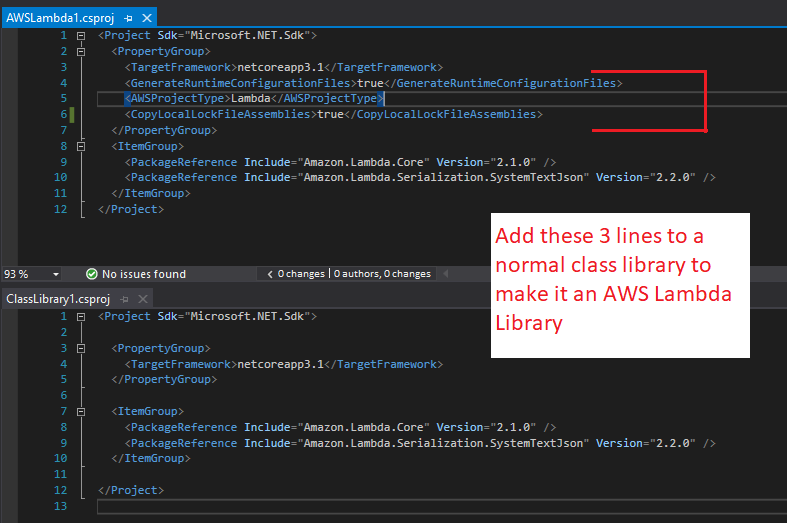
If you want to convert an existing project to one that can be published with the Alexa tools, it is not difficult.  Just add the 2 nuget packages

  • Amazon.Lambda.Core
  • Amazon.Lambda.Serialization.SystemTextJson

and update the project file by adding the the three lines shown in the image to the ProjectGroup.

Lambda Function Creation Screen

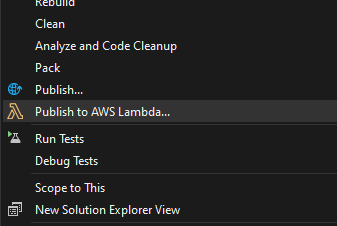
When your project is configured for publishing, you should get the context menu shown when you right click the project.

Lambda Function Creation Screen

Publishing from Visual Studio

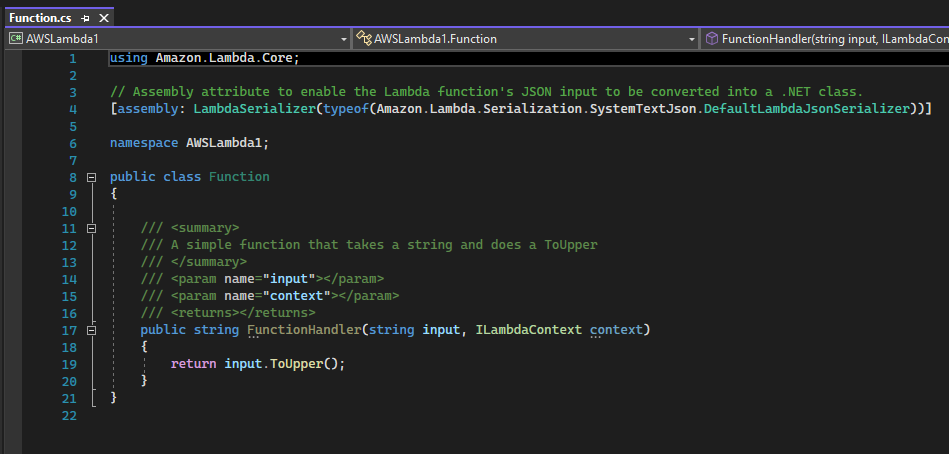
Now we are ready to publish our C# method to the AWS Lambda.  The sample Lambda function given by creating a new project is very simple.  If you want to convert an existing method to this, just add the assembly reference.

[assembly: LambdaSerializer(typeof(
  Amazon.Lambda.Serialization.SystemTextJson.DefaultLambdaJsonSerializer))]
Lambda Function Creation Screen

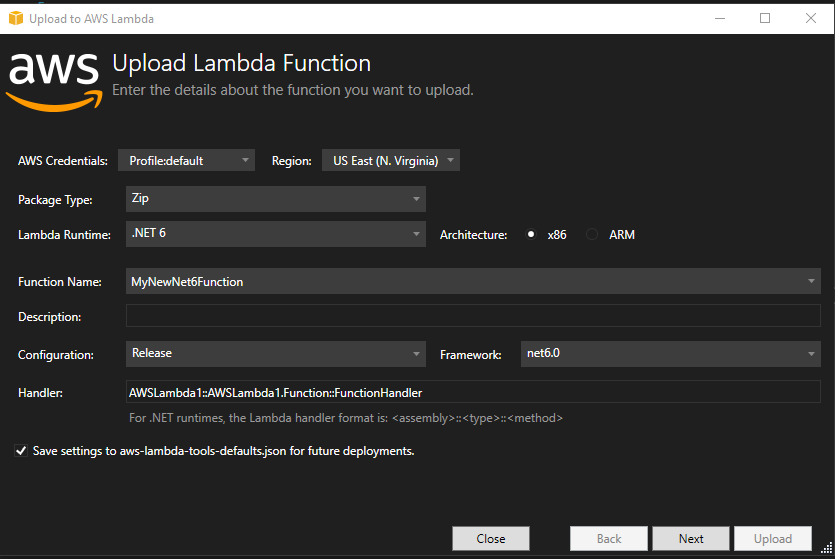
So we’re finally to the important part.  Right click the project and choose Publish to AWS Lambda.  You should see a screen similar to the one on the right.

It is not very clear what the Handler parameter contains, so here is a breakdown.  Each piece below is separate by two colons

  • Assembly Name (in this case AWSLambda1)  This is often, but not necessarily, the name space.  You can find it in the Project Properties under Application -> General -> Assembly Name
  • Fully qualified class name (here we have AWSLambda1.Function)
  • Method Name (for us it’s FunctionHandler)

These three parameters give us the final result of
AWSLambda1::AWSLambda1.Function::FunctionHandler

GOTCHA: Note that if you change the Function Name, or click Next then Previous, the Handler setting will reset to it’s original value.
If you run the lambda and get an error saying “Could not find the specified handler assembly with the file name ‘LambdaTest'” this is probably what happened.

Lambda Function Creation Screen

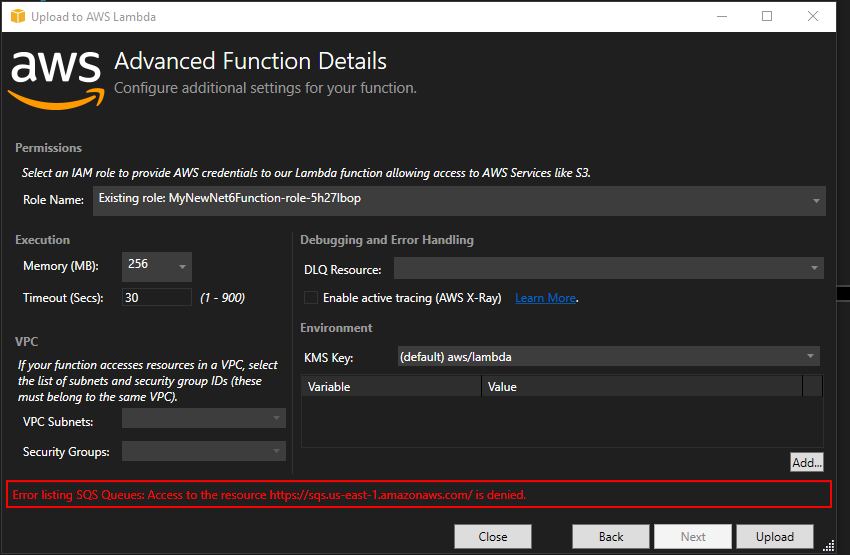
The first time you publish your method you will have to choose the Role Name.  This is the name we created earlier so choose the proper one from the drop down box.  If you get a red error about SQS Queues, you can ignore it.

Lambda Function Creation Screen

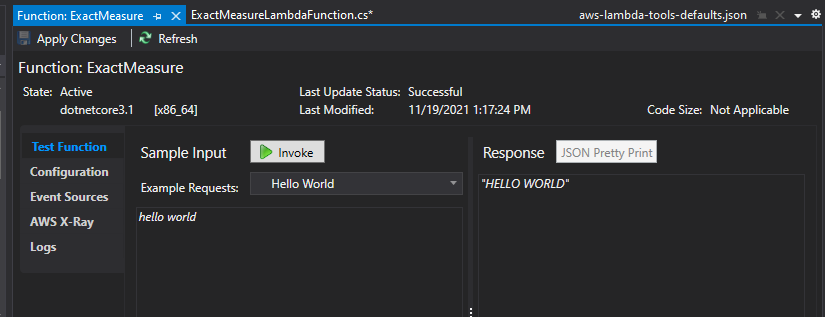
Once the publish is complete, you should see a screen to use to test your new installation.  Entering some text and pressing the Invoke button should echo back the text in all capital letters.

Lambda Function Creation Screen

And that’s it.  Your function is published and ready to go.

By |2022-06-23T16:44:01+00:00November 4th, 2021|Architecture, AWS|0 Comments