Connect an Alexa Skill to a .Net Lambda Method

Custom Alexa Skills can be implemented in many languages, but using .Net for the back end logic is my personal favorite.  Once you have a Lambda method defined and working using .Net, you create an Alexa Skill that uses that Lambda.  The process is slightly different from the one you use for the other languages, though.

Create the Alexa Skill

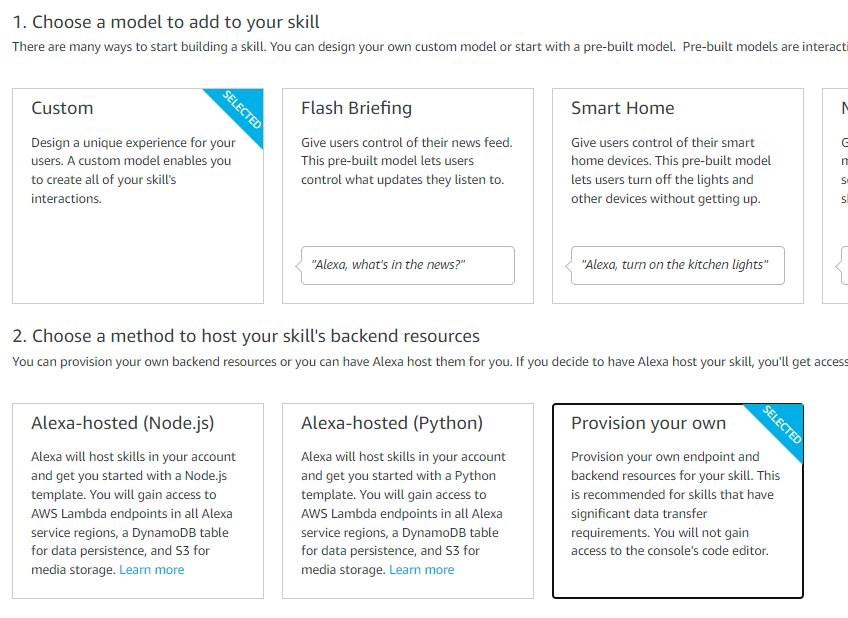
You begin by creating the Alexa Skill in the normal way.  Go to the Alexa Developer Console and click Create Skill.  Enter your skill name, but choose “Custom” for the model and “Provision your own” for the host method.  Then click Create Skill.

Create the skill

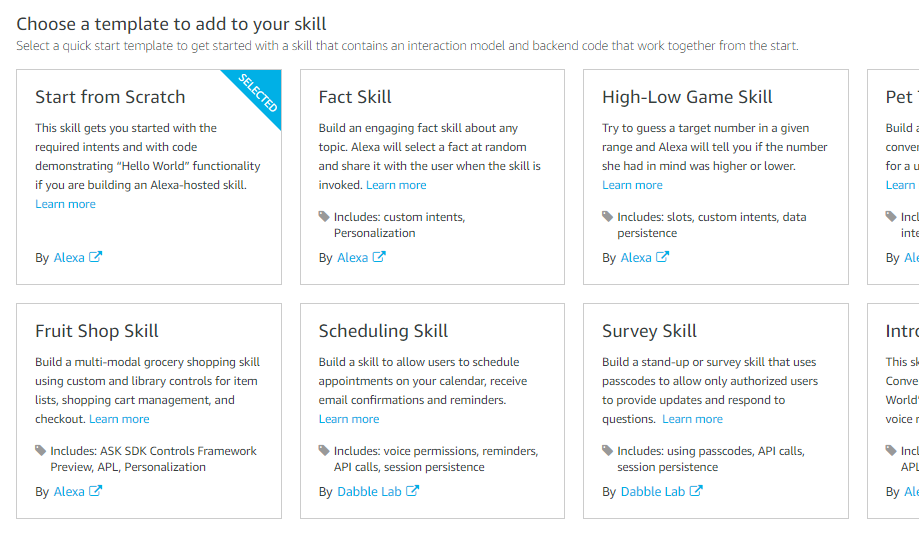
When asked to choose a template, choose “Start from Scratch”

When the process finishes you will be on the Build screen.

Lambda Function Creation Screen

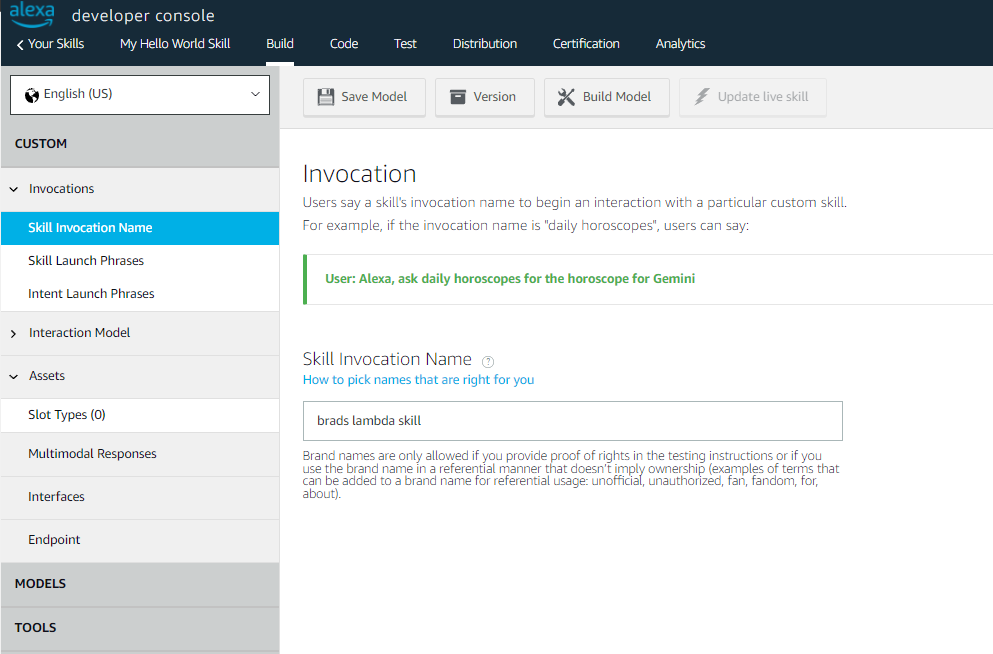
Choose the Skill Invocation Name and give your skill a name.  This is the name you will speak when you want to activate your skill.  For example, if we name it “brads lambda skill” we would say “Alexa, open brads lambda skill”.

When you are done click Save Model, then Build Model.

Avoid naming your skill anything with “Hello World” in it.  The Alexa Voice Services often confuses this name with the built in Alexa Skill “Hello World” and it will appear your skill is not working.

Lambda Function Creation Screen

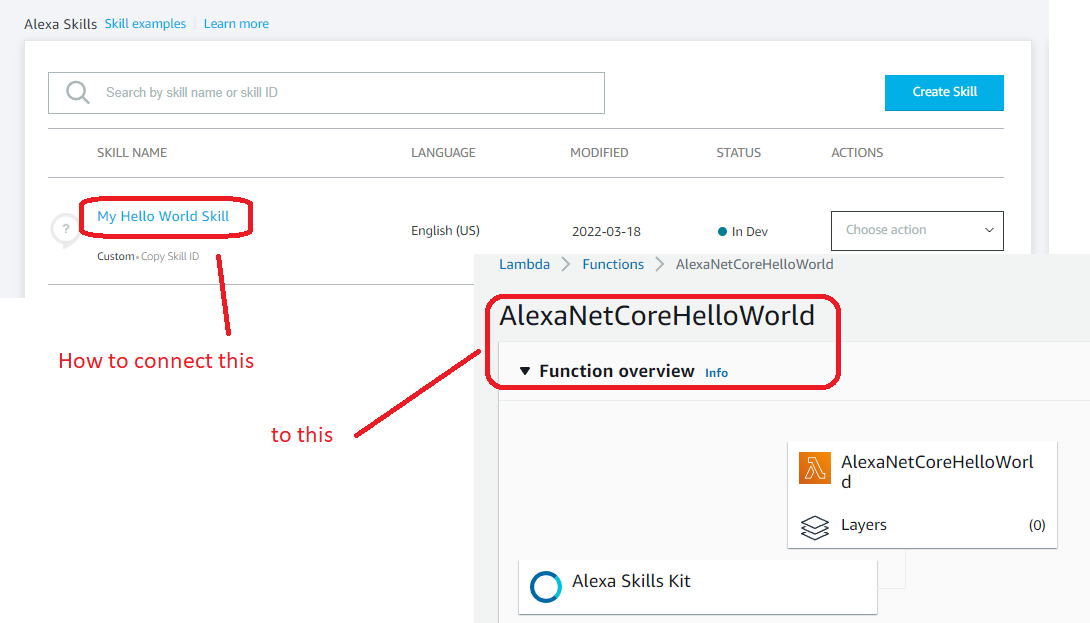
The part that comes next is a bit of the chicken-and-the-egg.  We need a Lambda to assign to the endpoint of the skill, but we need a skill (and its ID) to grant permissions in the Lambda.

For now, copy the skill ID to the clipboard.

Lambda Function Creation Screen

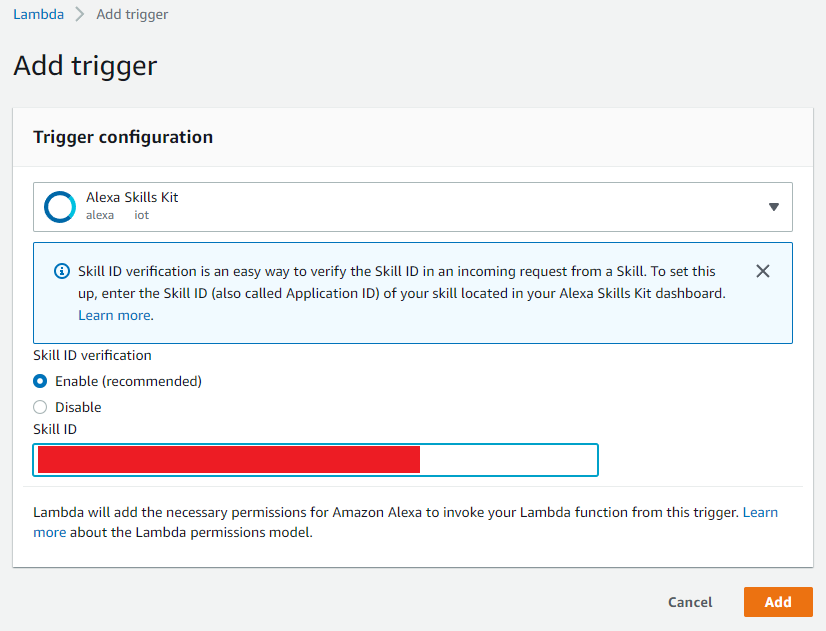
Go to the Admin panel for the Lambda you want to wire up to the Alexa skill.  Choose the Configuration tab and the Triggers sub-tab. Click Add Trigger and add the Alexa Skills Kit as the trigger.  Choosing this will also give you a box to paste in the Skill ID of the Alexa Skill you copied.

Lambda Function Creation Screen

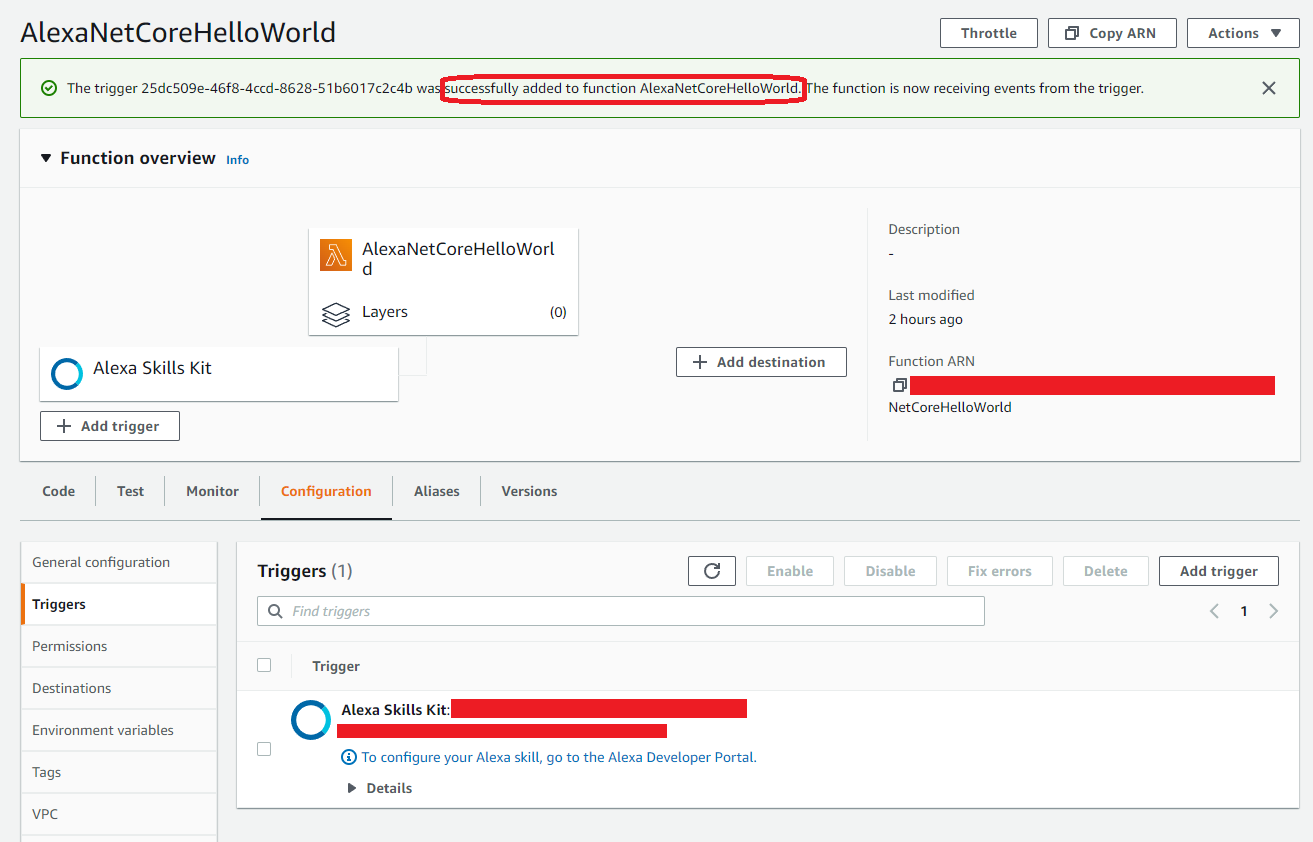
You should see a Success message and a new trigger associated with the Lambda.

What this has done is setup the Lambda so the Alexa Skill can call it.  However, we have not told the Alexa Skill what lambda to call yet.  We will do that next.

Lambda Function Creation Screen

Setting Endpoint in your Alexa Skill

Copy the ARN from the Lambda you want to connect to your skill.

Lambda Function Creation Screen

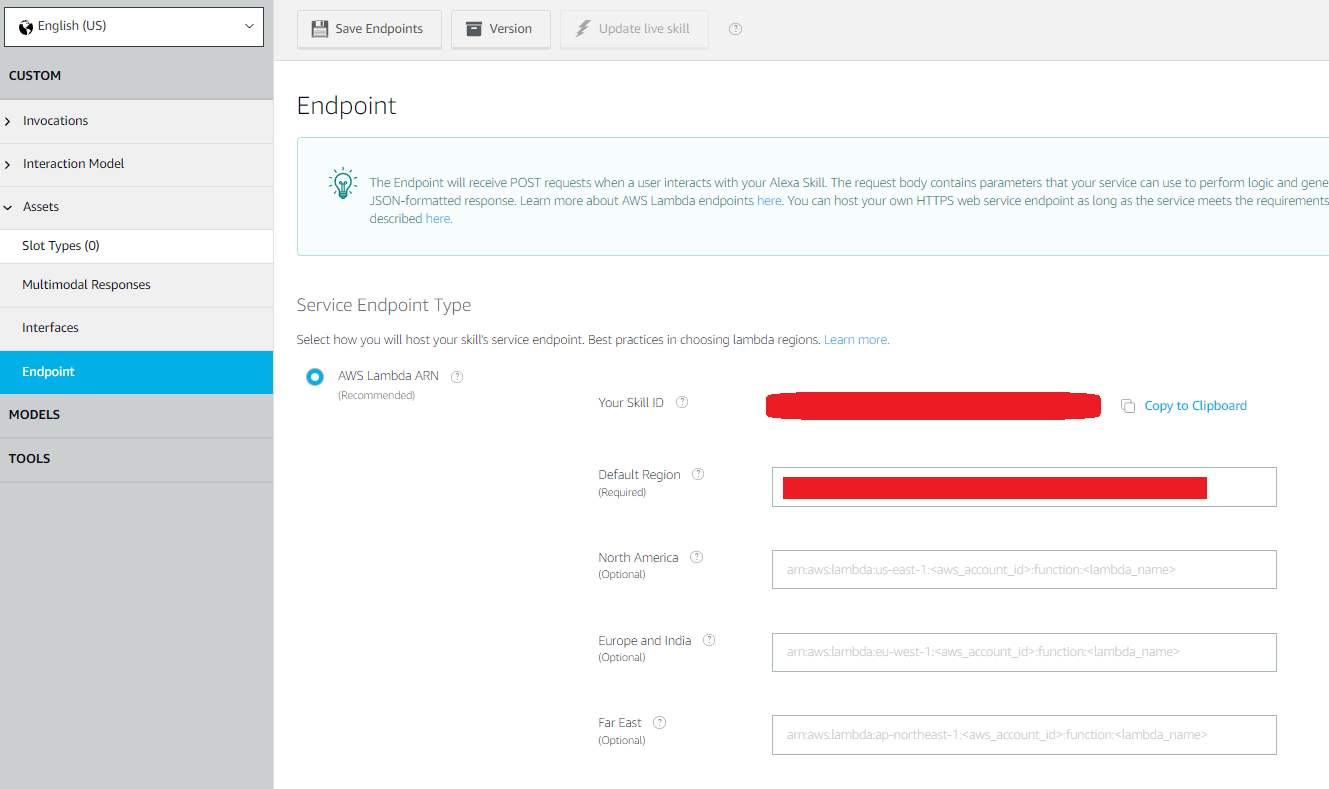
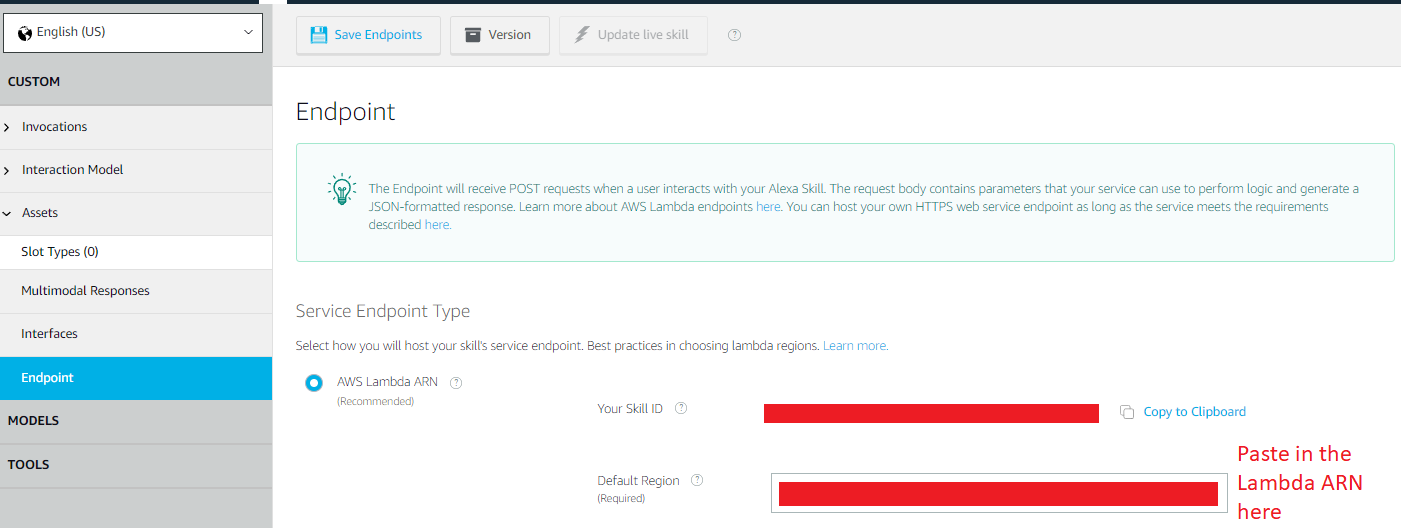
Return to the Alexa Developer Console where you were specifying the endpoint for your Alexa Skill.  Paste in the ARN from the Lambda into the Default Region box.  Save the endpoints.

Lambda Function Creation Screen

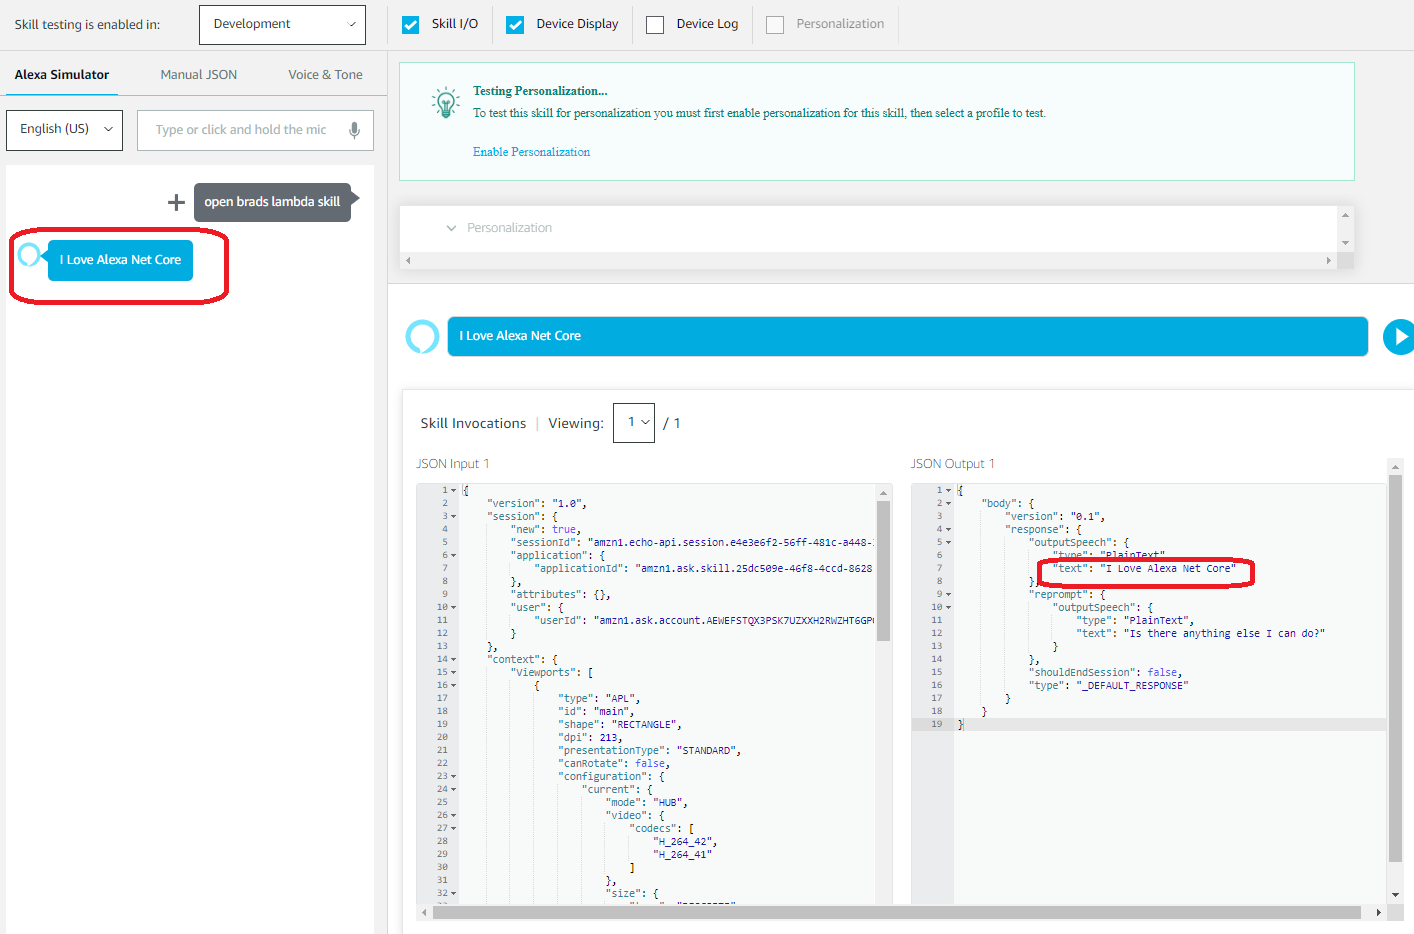
Now we can test our new skill against our Lambda.  Go to the Test tab in the Alexa Developer Console.  If you see “Test is disabled for this skill”, just set the combo box to “Development”.

At the top left corner, type in “Use {my skill}” where {my skill} is the name you gave to your skill.  For this tutorial, we called it “brads alexa skill” so we type that.  We should see the proper response from the lambda method.

Lambda Function Creation Screen

And that’s it.  Your skill is connected to your Lambda and is ready to go.

You can test your skill on any Alexa enabled device you own.  However it will only be available on devices that are connected to the AWS account that created the skill.  When you are ready to publish your skill for public consumption, check back here for how to do it.
By |2022-03-18T14:15:23+00:00March 1st, 2022|Alexa, Architecture, AWS|0 Comments
  • Publish a C# function to AWS Lambda from Visual Studio

Publish a C# Function to AWS Lambda using .Net Core 3.1 or .Net 6

Publishing a C# function to an AWS Lambda is not difficult.  Amazon has provided a Visual Studio add-in that does nearly all the work for you – as long as you get it setup correctly.  This is a short tutorial showing just where to get the different pieces of info you need to publish your method.

Lay the Ground Work

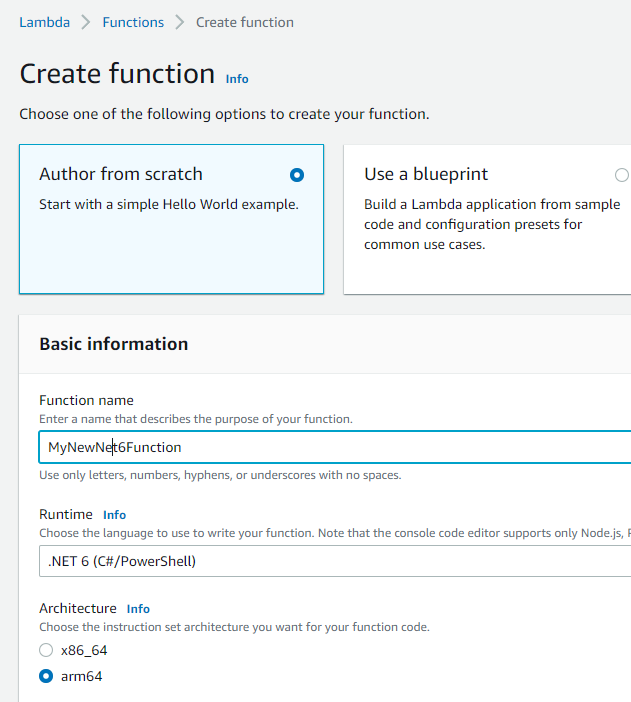
Create the new Lambda by opening your Lambda Home page and press “Create function” to get the screen shown below.  Configure your Lambda as shown in the image on the right, then press Create.

You may choose either .NET 6 or .NET Core 3.1, depending on your needs.  I run my .NET Core workloads under the arm64 architecture because it is less expensive to run, but choose the x86_64 if you like.

Create New Net 6 Function in AWS

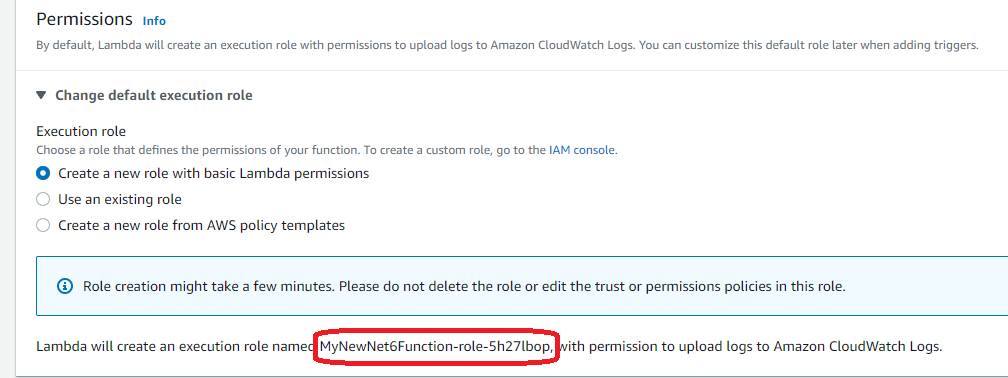
At the bottom of the Lambda Creation screen you will see an area for “Change default execution role”.  Expand that to see the options.

On the bottom of this screen you will see the name of the new Lambda execution role that will be created.  Make a note of this role name since you will need it later.

When you are done press the Create Function button.

Lambda Function Creation Screen

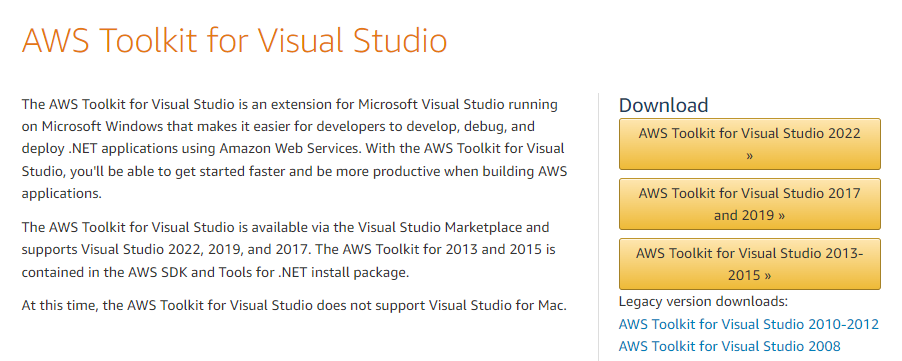
You will need to have the AWS Toolkit installed in Visual Studio.  In this example we are using Visual Studio 2022 so I have the 2022 version installed.  VS2019 users should install  the AWS Toolkit for Visual Studio 2017 (a 2019 version does not exist).

Lambda Function Creation Screen

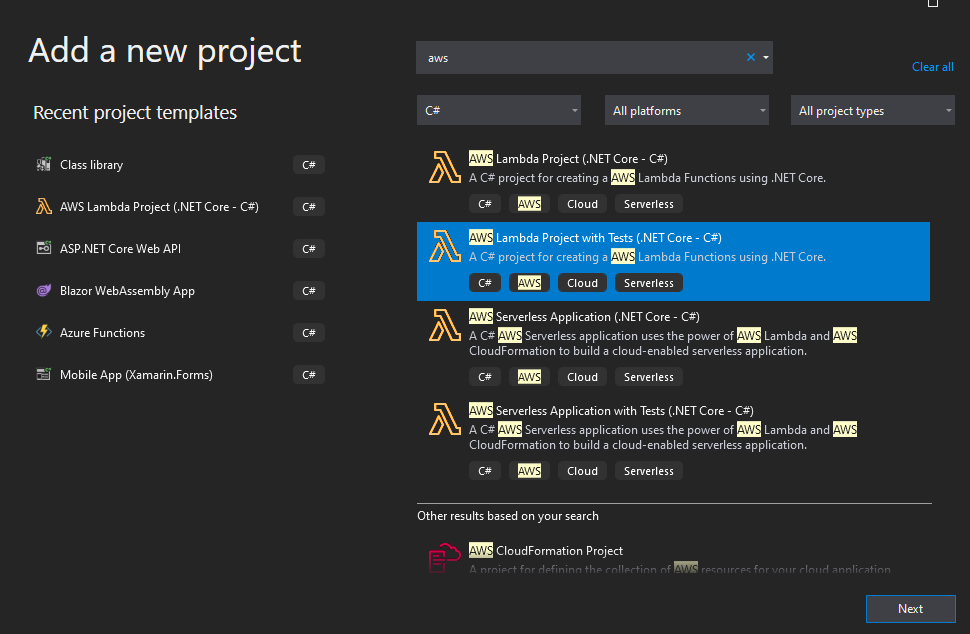
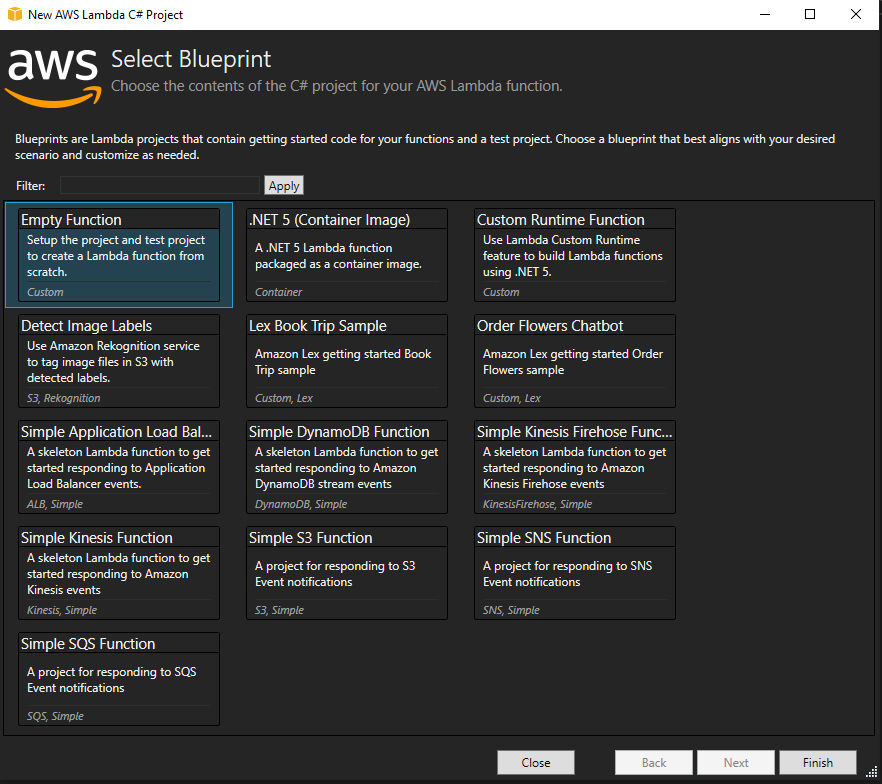
To publish a C# method to an AWS Lambda function all you need is a normal class library project.  However, the AWS tool provides a special project type that has a lot of the settings you need already wired up.  It provides a blueprint project (shown in the screenshot below) that allows you to choose many different kinds of functions.  For today, were just going to choose the empty function.

Lambda Function Creation Screen

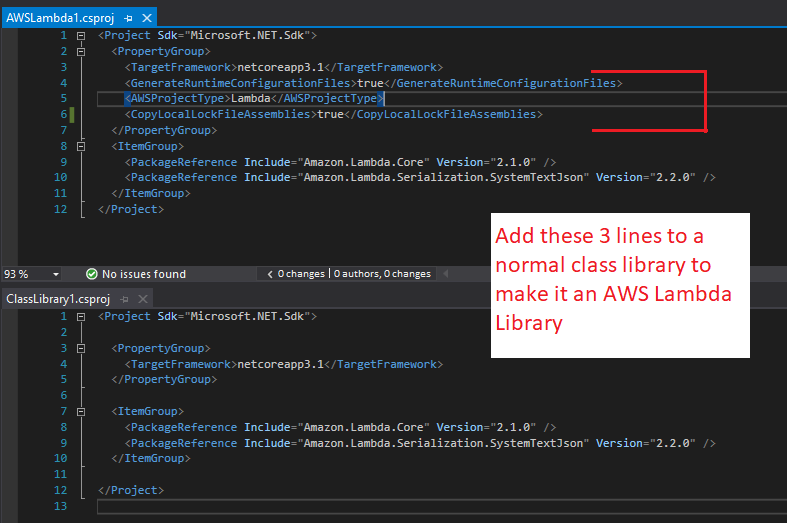
If you want to convert an existing project to one that can be published with the Alexa tools, it is not difficult.  Just add the 2 nuget packages

  • Amazon.Lambda.Core
  • Amazon.Lambda.Serialization.SystemTextJson

and update the project file by adding the the three lines shown in the image to the ProjectGroup.

Lambda Function Creation Screen

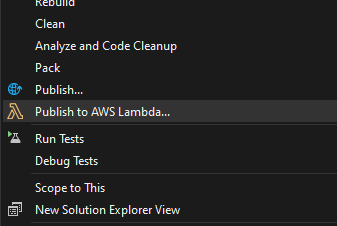
When your project is configured for publishing, you should get the context menu shown when you right click the project.

Lambda Function Creation Screen

Publishing from Visual Studio

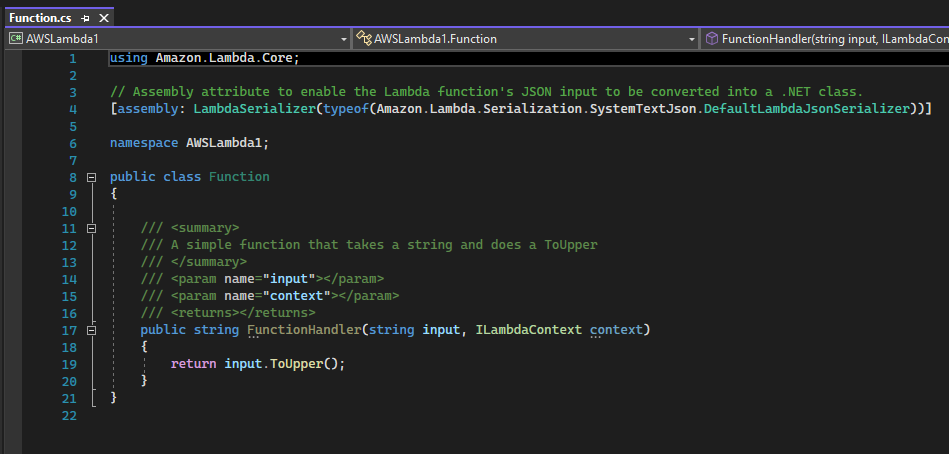
Now we are ready to publish our C# method to the AWS Lambda.  The sample Lambda function given by creating a new project is very simple.  If you want to convert an existing method to this, just add the assembly reference.

[assembly: LambdaSerializer(typeof(
  Amazon.Lambda.Serialization.SystemTextJson.DefaultLambdaJsonSerializer))]
Lambda Function Creation Screen

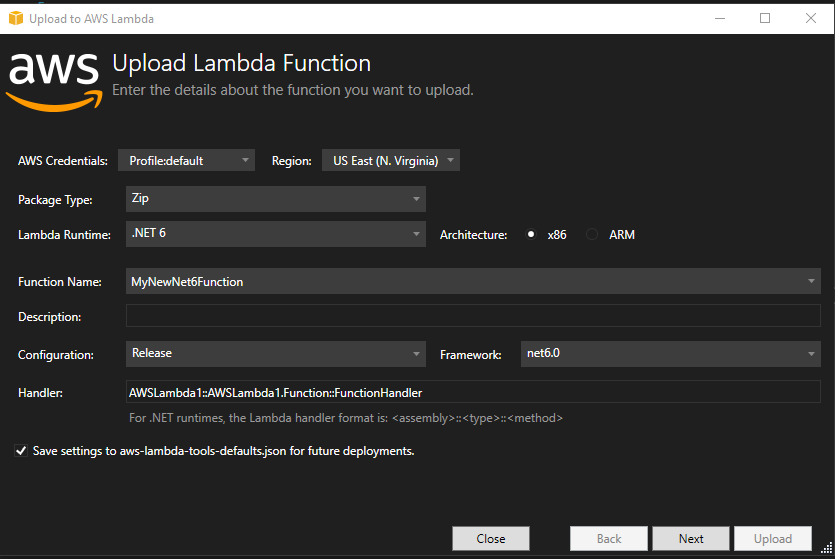
So we’re finally to the important part.  Right click the project and choose Publish to AWS Lambda.  You should see a screen similar to the one on the right.

It is not very clear what the Handler parameter contains, so here is a breakdown.  Each piece below is separate by two colons

  • Assembly Name (in this case AWSLambda1)  This is often, but not necessarily, the name space.  You can find it in the Project Properties under Application -> General -> Assembly Name
  • Fully qualified class name (here we have AWSLambda1.Function)
  • Method Name (for us it’s FunctionHandler)

These three parameters give us the final result of
AWSLambda1::AWSLambda1.Function::FunctionHandler

GOTCHA: Note that if you change the Function Name, or click Next then Previous, the Handler setting will reset to it’s original value.
If you run the lambda and get an error saying “Could not find the specified handler assembly with the file name ‘LambdaTest'” this is probably what happened.

Lambda Function Creation Screen

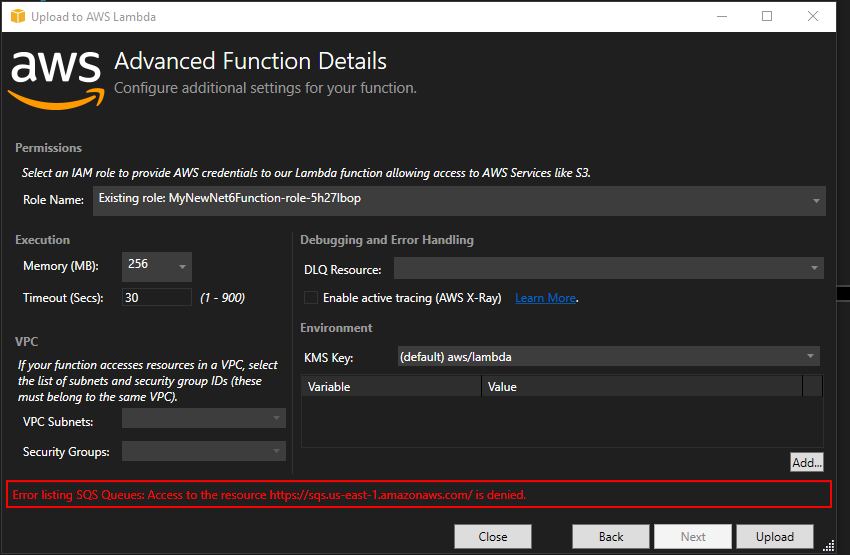
The first time you publish your method you will have to choose the Role Name.  This is the name we created earlier so choose the proper one from the drop down box.  If you get a red error about SQS Queues, you can ignore it.

Lambda Function Creation Screen

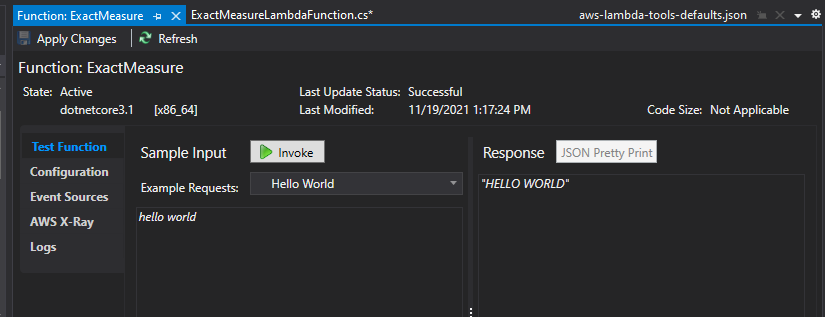
Once the publish is complete, you should see a screen to use to test your new installation.  Entering some text and pressing the Invoke button should echo back the text in all capital letters.

Lambda Function Creation Screen

And that’s it.  Your function is published and ready to go.

By |2022-06-23T16:44:01+00:00November 4th, 2021|Architecture, AWS|0 Comments

Difference Between Event and Message

Those new to Event Driven Architectures often treat the words “events” and “messages” as interchangeable.  Though they have a lot of elements in common, they are meant for different purposes and have different properties.  The most common definition I get for the two words is that of a message.

Though they have a lot of elements in common, events and messages are meant for different purposes

Messages

A message is a request from one system to another for an action to be taken.  The sender may or may not know what process is going to receive and process the message, but there is an expectation by the sender that it will get processed somehow.  The sender includes in the message a full payload of data that needs to be processed, and formats that data appropriately for the receiver to process (i.e. a contract exists between the two systems).  Naming of a message is usually done as a request (I like to imagine putting “please” in front of the name) – ReceiveInventoryFromManufacturer or CreateUser.

The key idea to remember is that messages are a request for something to happen – it hasn’t happened yet, and may not happen if the request violates any business rules.

A message carries the assumption that something somewhere will process it.  This is the beginning of a process that will probably result in the change of data somewhere in the system.

A messages can also affect more than one aggregate.

Events

An event, on the other hand, is a notification that data has been processed and some objects’ state has changed.  Though events frequently are created after processing a message, that is not required.   The data change could have been made in response to any appropriate request by any system.

Events are usually named in the past tense for the aggregate whose state changed, such as InventoryIncremented or ProductCreated.  When naming your events, though, don’t be too generic.  Something like InventoryUpdated is not descriptive enough.  When reading a list of events, you should have a pretty good idea of what happened.

As opposed to a message , for an event there is no expectation of further processing.  An event is the end result of processing a message, and the results reflected in an event are “cast in stone”.

Events can also only refer to a single aggregate.  If a message results in changes to multiple aggregates, then multiple events are created by the single message.

Event Names

Look at the following examples for events that all affect inventory levels and see which one gives a better idea of what is going on.  Note that the events on the right are all named in past tense, and reflect the business idea that is happening.

  • Product Created

  • Inventory Updated

  • Inventory Updated

  • Inventory Updated

  • Inventory Updated

  • Inventory Updated

  • Product Created

  • Shipment Received from Manufacturer

  • Item Sold

  • Item Returned

  • Defective Item Returned to Manufacturer

  • Manual Inventory Count

Content of Events and Messages

Since events and messages have different purposes, they will contain different embedded information.

Messages contain any information necessary to perform the requested action.  For example, a message may contain the ID of the user that requested the operation, the ID of the business entity that will be affected, and the new value of any properties.

Events will only contain the ID of the item affected, and the data that was changed. They should be lightweight in that they do not include all aggregate data; just the data that changed.   If the aggregate is small (less than 5 properties including the ID), I will bend this rule and include the entire aggregate.

When planning what data to include in the event, remember that it should be usable as an event source.  An Event Source is a stream of changes made to a particular object that, when added all together, will result in the current state of that object.  In a true Event Sourcing system, the only data persisted will be the stream of events so if any data is excluded from an event, the change will not be reflected in the final state.  In many systems, the current state of an object is often saved in a database and the stream of events is only used as an historical record of how the entity got to the state it is in.  However, event content should be planned as if no database exists.

By |2021-02-15T22:06:37+00:00February 1st, 2021|Architecture, CQRS, DDD|0 Comments